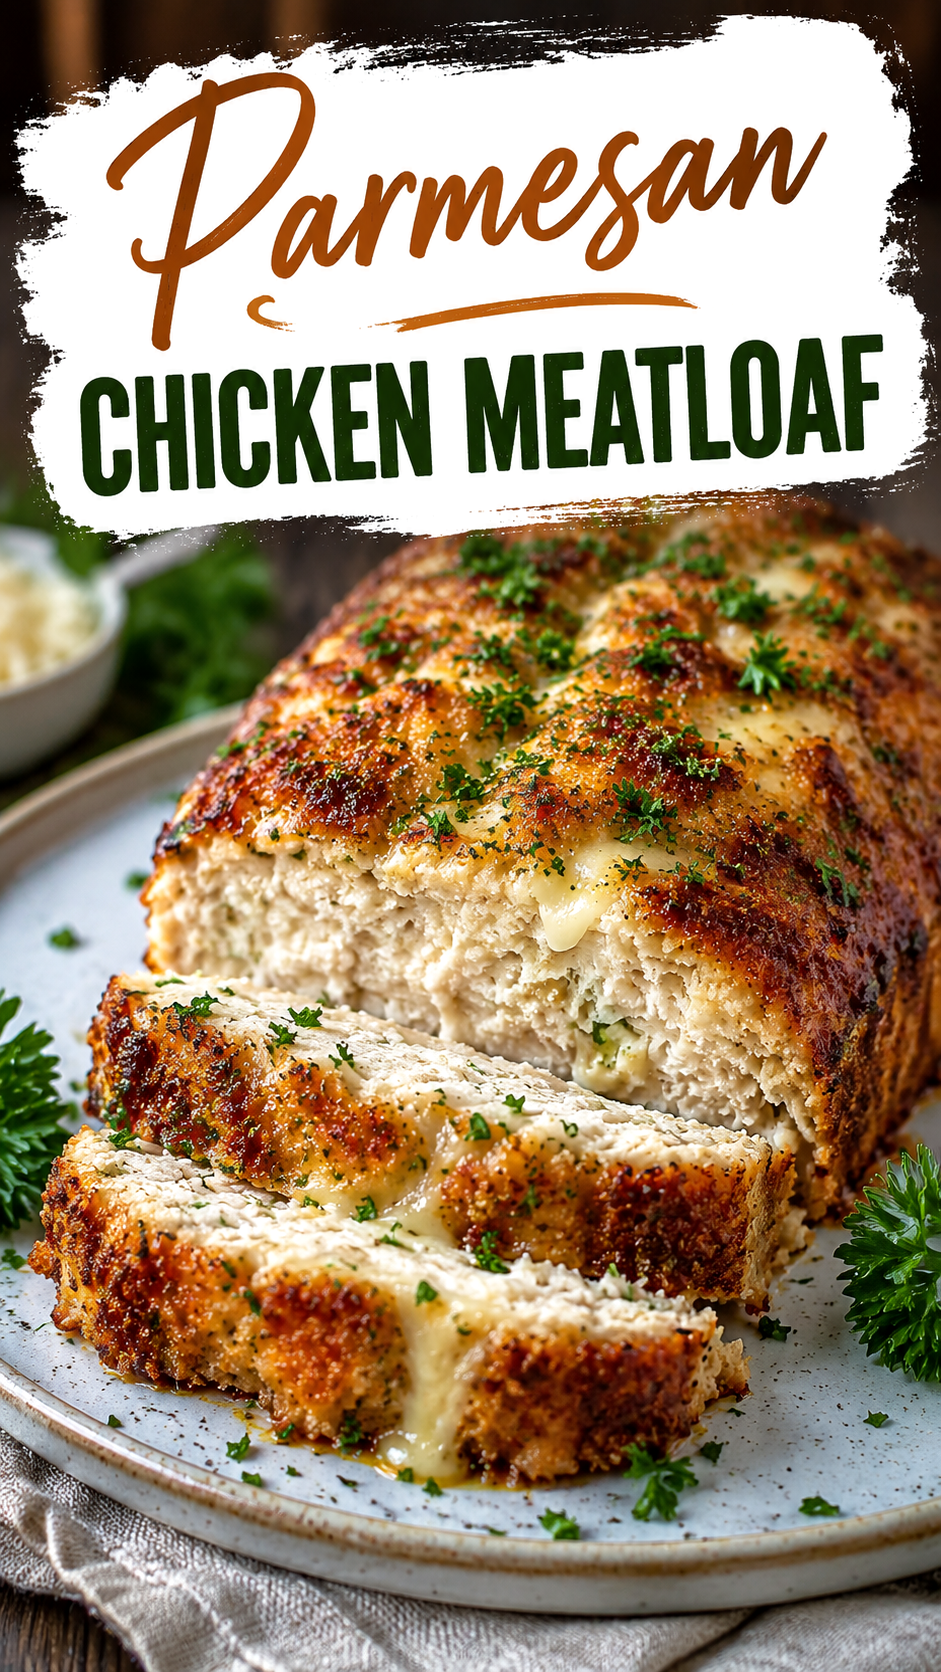
Blog

  • Cozy Cajun White Chicken Chili Recipe

    Cozy Cajun White Chicken Chili Recipe

    Cozy Cajun White Chicken Chili Recipe: A Tropical Delight

    Introduction to Cozy Cajun White Chicken Chili Recipe

    Are you ready to embark on a culinary adventure that merges comfort food with a kick of flavor? This Cozy Cajun White Chicken Chili recipe will be your new go-to dish for chilly evenings, family gatherings, or meal prep for the week ahead. Imagine a warm bowl of tender chicken, creamy white beans, and a medley of spices that dance on your palate. This chili is not just enjoyable; it’s incredibly versatile too – perfect for busy weeknights or leisurely weekend meals.

    Beyond its delicious taste, there’s a lot to love about this healthy white chicken chili. It packs a nutritional punch, being rich in protein and fiber while low in unhealthy fats. Whether you’re a health-conscious individual or just trying to feed your family something wholesome, this recipe fits the bill. Additionally, it can be easily modified for various dietary requirements—vegan, gluten-free, or even lower-calorie options can easily be accommodated.

    One of the best parts? This white chicken chili comes together in under an hour from start to finish. It’s simple enough for novice cooks yet complex in flavor to satisfy food enthusiasts. So put on your apron and gather your ingredients; your cozy Cajun adventure awaits!

    Benefits and Advantages of Cozy Cajun White Chicken Chili Recipe

    There are countless reasons to love this Cozy Cajun White Chicken Chili recipe. First and foremost, it exemplifies ease of preparation. With straightforward instructions, this dish allows even the most busy of parents or students to whip up a hearty meal without hassle. One-pot simplicity means less time spent washing dishes and more time gathered around the table with loved ones.

    Health benefits are another compelling aspect. This white chicken chili is loaded with lean protein from chicken and fiber from white beans, which can help keep you feeling fuller longer. It’s also a great source of vitamins and minerals thanks to the variety of vegetables mixed into the pot. Moreover, with the spice blend typical of Cajun cuisine, it has antioxidant properties, helping to fight inflammation and boost immunity.

    What makes this chili truly stand out is its versatility. It seamlessly adapts to various dietary needs without sacrificing flavor. Whether you are cooking for a meat lover or a plant-based eater, you can substitute ingredients without worry. The flavors meld beautifully to create a comforting dish that feels indulgent yet is genuinely wholesome. This makes it an excellent option for anyone looking to please a crowd—be it a dinner party, a casual gathering, or just a cozy night in.

    Ingredients Overview

    Essential Ingredients for Cozy Cajun White Chicken Chili Recipe

    To create a delicious white chicken chili, you will require the following essential ingredients:

    • Chicken Breast (1 lb): Lean protein that forms the base of your chili. For a vegan alternative, use firm tofu or tempeh.
    • White Beans (2 cans, drained and rinsed): Provides creaminess and fiber. Cannellini or Great Northern beans are ideal but feel free to use cooked chickpeas as an alternative.
    • Chicken Broth (4 cups): Adds depth of flavor. For a vegetarian version, substitute with vegetable broth.
    • Coconut Milk (1 cup): Gives a creamy texture and subtle sweetness. Low-fat options can be used if you’re watching calories.
    • Onion (1 medium, diced): Adds a foundation of flavor. Can be replaced with shallots if you’re on a low-FODMAP diet.
    • Garlic (4 cloves, minced): A must-have for aromatic depth. Fresh or powdered garlic works well.
    • Bell Peppers (1 red, 1 green, diced): Color and nutrients. Substitute with zucchini or carrots for a veggie version.
    • Cajun Spice Mix (2 tablespoons): This condiment is responsible for the signature flavor. You can buy this or make your own mix with paprika, cayenne pepper, thyme, and oregano.
    • Corn (1 cup, fresh or frozen): Adds sweetness and texture. This is optional but recommend to enhance the chili.
    • Olive Oil (1 tablespoon): For sautéing. Use coconut oil for a tropical twist or omit if cooking with non-stick cookware.

    These ingredients together create a wonderfully fragrant and creamy chili that your family is sure to love!

    Dietary Substitutions to Customize Your Cozy Cajun White Chicken Chili Recipe

    To make sure everyone enjoys this cozy dish, consider the following substitutions:

    • Vegan Option: Replace chicken with extra firm tofu or vegan chick’n strips to still get that satisfying texture. Use vegetable broth instead of chicken broth and opt for cashew cream instead of coconut milk for added richness.
    • Gluten-Free: Ensuring that your broth and any packaged spices are certified gluten-free can easily adapt this recipe for gluten-sensitive individuals.
    • Lower-Calorie Version: Swap out coconut milk for low-fat or unsweetened almond milk, and reduce the quantity of olive oil used.
    • Bean-Free Version: You can omit the beans entirely, increasing the chicken quantity for those following a low-carb diet. Instead, add more vegetables like cauliflower or even sweet potatoes for texture.

    With these simple variations, you can take your Cajun white chicken chili from a classic dish to a personalized masterpiece suitable for a variety of dietary restrictions!

    How to Prepare the Perfect Cozy Cajun White Chicken Chili Recipe: Step-by-Step Guide

    Ready to dive into preparing your very own Cozy Cajun White Chicken Chili? Just follow these simple steps:

    1. Gather Your Ingredients: Start by rounding up all your ingredients from the list above. Having everything on hand makes the process smoother!

    2. Prepare the Chicken: If using chicken breasts, cut them into bite-sized pieces for quicker cooking. Season them lightly with salt and pepper.

    3. Sauté the Vegetables: In a large pot, heat the olive oil over medium heat. Add the diced onion and bell peppers, sautéing until they are soft (approximately 5 minutes). This develops a flavorful base.

    4. Add Garlic: Incorporate the minced garlic into the pot, stirring for about 30 seconds until fragrant. Be careful not to burn it!

    5. Cook the Chicken: Add the seasoned chicken to the sautéed vegetables and cook until the pieces are lightly browned on all sides (about 5-7 minutes).

    6. Mix in the Spices: Sprinkle your Cajun spice mix over the chicken and vegetables. Stir to ensure the chicken and veggies are well coated in the spices.

    7. Combine the Broth and Beans: Pour in the chicken broth, followed by adding the drained white beans. Mix well to combine the ingredients.

    8. Add Coconut Milk: Pour in the coconut milk, stirring until it’s fully incorporated. The coconut milk adds a rich creaminess that’s essential for this chili.

    9. Incorporate Corn: Toss in the corn now, which adds sweetness and texture. Stir everything together and bring the mixture to a gentle simmer.

    10. Simmer: Allow your white chicken chili to simmer for about 20-30 minutes. This gives the flavors time to meld beautifully, and as it cooks, the chili will thicken slightly.

    11. Adjust Seasoning: Taste your chili before serving, adjusting salt, pepper, or Cajun seasoning as needed. This step elevates the dish.

    12. Serve: Ladle the chili into cozy bowls. Top with optional garnishes such as sliced green onions, avocado, or fresh cilantro for an added burst of flavor.

    13. Enjoy: Relish every bite of your homemade Cajun white chicken chili! This dish is perfect for sharing with family or freezing for later.

    By following these detailed steps, you can create a bowl of creamy, comforting chili that appeals to all ages and dietary preferences. Don’t hesitate to experiment with the ingredients to suit your palate!

    Mastering Cozy Cajun White Chicken Chili Recipe: Advanced Tips and Variations

    To truly master your Cozy Cajun White Chicken Chili, consider the following advanced tips and exciting variations:

    • Cooking Method Variations: This recipe can also be made in a slow cooker or an Instant Pot. For slow cooking, combine all ingredients and cook on low for 6-8 hours. For an Instant Pot, use the sauté function for the vegetables and chicken, then add the liquids and beans before sealing the pot and cooking on high pressure for 10 minutes.

    • Flavor Enhancements: For added depth, consider adding a splash of lime juice or vinegar just before serving to brighten the flavors. The acidity balances the creaminess beautifully!

    • Spice Levels: Increase or decrease the Cajun seasoning according to your personal heat preference. Adding diced jalapeños while cooking can also give an extra kick.

    • Garnishing Options: Consider topping your chili with shredded cheese, sour cream, or crushed tortilla chips for added texture and flavor. This adds a delightful crunch and richness to your dish.

    These tips and ideas will not only elevate your cooking skills but can also make each serving of chicken chili a unique experience every time!

    How to Store Cozy Cajun White Chicken Chili Recipe: Best Practices

    If you’re lucky enough to have leftovers, storing your white chicken chili is simple!

    • Refrigeration: Allow the chili to cool to room temperature before transferring it into an airtight container. It will keep in the refrigerator for up to 4 days. When reheating, ensure it reaches a minimum internal temperature of 165°F.

    • Freezing: To freeze, portion the chili into freezer-safe bags or containers, leaving some space for expansion. It can be stored in the freezer for up to 3 months. Thaw overnight in the fridge before reheating on the stove or in the microwave.

    • Reheating Tips: When warming up your chili, add a splash of chicken broth or water if the chili has thickened too much in the fridge. Stir well while heating to ensure it warms evenly.

    These storage tips will guarantee that your Cozy Cajun White Chicken Chili remains delicious and ready to enjoy even days after it’s been cooked!

    Nutritional Value of Cozy Cajun White Chicken Chili Recipe

    Understanding the nutritional value of your meals can help you make educated dietary choices. Here’s a breakdown of the estimated nutritional information per serving (based on a recipe yielding 6 servings):

    • Calories: 320
    • Protein: 25g
    • Carbohydrates: 35g
    • Fiber: 8g
    • Sugars: 3g
    • Fat: 10g
    • Saturated Fat: 4g
    • Sodium: 600mg
    • Cholesterol: 60mg

    This white chicken chili packs a healthy punch, filled with a mix of macronutrients. Feel free to adjust the ingredients to suit specific dietary preferences to enhance the nutritional profile. For instance, using less oil, subbing coconut milk with almond milk, or incorporating more veggies can shift these values favorably.

    FAQs: Frequently Asked Questions About Cozy Cajun White Chicken Chili Recipe

    Q1: Can I make this white chicken chili in advance?

    Absolutely! This dish is perfect for meal prep as it tastes even better the next day. You can make it a day ahead and store it in the refrigerator, allowing the flavors to meld.

    Q2: Is there a vegetarian option for this recipe?

    Yes! Substitute the chicken with tofu or tempeh, and use vegetable broth and cashew cream instead of chicken broth and coconut milk. You’ll get a creamy, satisfying dish that everyone can enjoy.

    Q3: How spicy is this Cajun white chicken chili?

    The spiciness can easily be adjusted by varying the amount of Cajun seasoning or adding fresh jalapeños. Feel free to customize it according to your taste!

    Q4: How long can I refrigerate leftovers?

    You can safely refrigerate the chili for up to 4 days. Make sure to store it in an airtight container for best results.

    Q5: What can I serve with Cajun white chicken chili?

    This chili pairs beautifully with cornbread, rice, or a fresh green salad. You can also top it with avocado, cilantro, or cheese for extra flavor.

    With these FAQs, you’ll be well-equipped to tackle any challenges while preparing your Cozy Cajun White Chicken Chili. Enjoy this hearty and delicious meal with your loved ones, knowing it’s nutritious, customizable, and enjoyable for everyone at the table!

  • Easy Mediterranean Baked Fish Dinner Recipe

    Easy Mediterranean Baked Fish Dinner Recipe

    Easy Mediterranean Baked Fish Dinner Recipe: A Tropical Delight

    Introduction to Easy Mediterranean Baked Fish Dinner Recipe

    Welcome to a delightful culinary journey that will transport your taste buds straight to the sunny shores of the Mediterranean! Our Easy Mediterranean Baked Fish Dinner Recipe combines simplicity, healthfulness, and vibrant flavors to create a meal that caters to various diets. This recipe is ideal for busy home cooks, health-conscious parents, students, food enthusiasts, and anyone looking for easy dinner recipes that don’t compromise on taste or nutrition.

    In just a few simple steps, you can prepare a dish that celebrates the freshness of the sea and the aromatic herbs often found in Mediterranean cooking. It’s perfect for weeknight dinners or special occasions alike. With its emphasis on light, wholesome ingredients, this baked fish dish is simultaneously satisfying and nutritious, making it an ideal choice for those focusing on a balanced diet. Plus, it’s adaptable for gluten-free, low-calorie, or even vegan preferences!

    Imagine flaky fish fillets infused with bright lemon, fragrant garlic, and fresh herbs, baked to perfection while retaining their moisture. This recipe not only highlights the delightful essence of Mediterranean cuisine but also promotes heart health thanks to the omega-3 fatty acids found in fish. So, gather your ingredients, set your oven, and get ready to enjoy a meal that promises both ease of preparation and a taste that tantalizes your palate.

    Benefits and Advantages of Easy Mediterranean Baked Fish Dinner Recipe

    There are countless reasons why our Easy Mediterranean Baked Fish Dinner Recipe stands out among typical dinner options. Here are some of the most significant advantages that make this dish a go-to for a healthy lifestyle:

    1. Health Benefits: This recipe is rich in omega-3 fatty acids, which are essential for heart health and cognitive function. The use of fresh vegetables, herbs, and olive oil further enhances its nutritional profile. Packed with protein and low in unhealthy fats, it aligns perfectly with a variety of dietary concerns.

    2. Ease of Preparation: Tailored for both seasoned cooks and beginners, this recipe necessitates minimal cooking skills but delivers maximum flavor. The fish bakes in just 20-25 minutes, turning a potentially labor-intensive meal into a quick weeknight dinner solution. By simply layering ingredients in one dish, you minimize cleanup while maximizing your time spent enjoying the meal.

    3. Versatile and Adaptive: The beauty of this recipe lies in its versatility. You can easily swap out the type of fish depending on personal preferences or what’s available at your local market. Moreover, the ingredients can be customized to suit gluten-free or vegan diets by using legumes or plant-based protein in place of fish. This adaptability ensures that it can cater to different taste buds and dietary restrictions, making it an inclusive dish for family gatherings or dinner parties.

    4. Flavor Explosion: What sets Mediterranean cuisine apart is its use of bold flavors – think olive oil, lemon juice, garlic, and fresh herbs. This recipe effortlessly showcases these elements, allowing you to experience a culinary delight that’s not only satisfying but also delightfully fragrant.

    5. Perfect for Meal Prep: The Easy Mediterranean Baked Fish can easily be prepared ahead of time. This makes it an excellent choice for meal prepping, ensuring healthy eating even during the busiest weeks. The flavors develop beautifully when stored, making leftovers something to look forward to!

    Overall, the Easy Mediterranean Baked Fish Dinner Recipe encapsulates the magic of quick, healthful dinners without the fuss. Its accessibility makes it a staple dish for everyone — from students to full-time professionals.

    Ingredients Overview

    Essential Ingredients for Easy Mediterranean Baked Fish Dinner Recipe

    To achieve the best results, gather the following ingredients:

    • Fish Fillets (4 pieces, approximately 6 ounces each): Choose a firm white fish like cod, halibut, or tilapia for the best texture. (Gluten-free, Low-calorie)
    • Olive Oil (2 tablespoons): Extra virgin olive oil adds richness and healthy fats. (Vegan, Gluten-free)
    • Lemon Juice (1 lemon’s worth): Freshly squeezed juice brightens the dish. (Vegan, Gluten-free)
    • Garlic (4 cloves, minced): Enhances flavor with its savory depth. (Vegan, Gluten-free)
    • Cherry Tomatoes (1 cup): Halved for sweetness and color. (Vegan, Gluten-free)
    • Bell Peppers (1 cup, sliced): Any color of bell pepper adds crunch and nutrition. (Vegan, Gluten-free)
    • Red Onion (1 medium, sliced): Provides a sharp, sweet aroma when roasted. (Vegan, Gluten-free)
    • Fresh Herbs (1/4 cup each of parsley and basil): For a fresh, fragrant finish. (Vegan, Gluten-free)
    • Salt and Pepper: To taste, elevating the overall flavor. (Vegan, Gluten-free)

    Dietary Note: For a vegan option, the fish can be substituted with firm tofu or chickpeas for a protein-rich alternative that captures the essence of the Mediterranean.

    Dietary Substitutions to Customize Your Easy Mediterranean Baked Fish Dinner Recipe

    Here are a few substitution ideas to cater to different dietary requirements:

    1. Fish Types: If you’re not fond of fish, consider using:
    2. Firm Tofu: Great for a vegan approach.
    3. Chickpeas: Roasted chickpeas are a fantastic plant-based protein alternative that soaks up the Mediterranean flavors well.

    4. Vegetarian Option: Replace fish with:

    5. Grilled eggplant or zucchini slices: Perfect for a hearty vegetarian meal.

    6. Gluten-Free Needs: This recipe is already gluten-free, but ensure that any added sauces or seasonings, like soy sauce or seasoning blends, are also gluten-free.

    7. Herb Alternatives: If you don’t have fresh herbs, dried Mediterranean herb blends can work in a pinch.

    8. Low-Calorie: Use less olive oil and substitute high-calorie ingredients with lower-calorie alternatives, such as:

    9. Cooking spray: Instead of olive oil for roasting.
    10. Zoodles (zucchini noodles): Instead of pasta as a side.

    By allowing yourself the freedom to innovate with the ingredients, this recipe truly becomes an easy and inclusive dining experience for all.

    How to Prepare the Perfect Easy Mediterranean Baked Fish Dinner Recipe: Step-by-Step Guide

    Now that you’ve gathered your ingredients, let’s dive into how to prepare this crowd-pleasing dish!

    1. Prepare the Base: Preheat your oven to 400°F (200°C). Meanwhile, prepare a baking dish by lightly greasing it with a bit of olive oil to prevent sticking.

    2. Assemble Vegetables: In the greased baking dish, arrange cherry tomatoes, bell peppers, and red onion slices in an even layer. This forms a colorful base for the fish and enhances flavors during baking.

    3. Season the Fish: Place the fish fillets atop the layered vegetables. Drizzle the remaining olive oil and lemon juice over the fish. Season generously with salt, pepper, and minced garlic. The garlic will impart an aromatic flavor as it cooks.

    4. Add Fresh Herbs: Sprinkle chopped parsley and basil over the fish and veggies. These herbs will add a delightful freshness to the dish.

    5. Bake to Perfection: Carefully place the baking dish in the preheated oven. Bake for approximately 20-25 minutes or until the fish is opaque and flakes easily with a fork.

    6. Prepare a Side (Optional): While the fish bakes, consider preparing a simple side salad with mixed greens, cucumbers, and a lemon vinaigrette. This adds a refreshing crunch alongside the warm, baked dish.

    7. Serve: Once baked, remove from the oven and let it cool for a minute. Serve the dish warm, spooning some of the roasted vegetables over the fish. Enjoy your delicious Mediterranean meal!

    8. Consider Leftovers: If you have leftovers, gently reheat them in the oven to maintain texture. Adding a splash of fresh lemon juice before serving again can revive the flavors!

    This recipe’s adaptability allows you to create a vibrant meal suited to your taste preferences, all while maintaining its status as one of the easy dinner recipes in your culinary repertoire.

    Mastering Easy Mediterranean Baked Fish Dinner Recipe: Advanced Tips and Variations

    To truly make the most out of your Easy Mediterranean Baked Fish Dinner Recipe, consider the following advanced tips and variations:

    1. Marinating the Fish: For intensified flavors, marinate your fish fillets in olive oil, lemon juice, minced garlic, and herbs for one hour before baking. This extra time allows the seasonings to permeate the fish, making it even more delicious.

    2. Herb Blends: Feel free to experiment with different herbs such as dill or tarragon, which can offer a unique twist to standard flavors.

    3. Additions: Enhance the dish by incorporating olives for a briny kick or capers for extra zing. Both elements will give an authentic Mediterranean vibe.

    4. Side Dishes: Serve the baked fish with a side of couscous, quinoa, or roasted potatoes. These complement the flavors of the fish while providing a wholesome balance.

    5. Grilling Option: On warm days, consider grilling the fish in a foil packet with the vegetables. Simply wrap the ingredients in aluminum foil and grill for about 15-20 minutes; this will give the dish a smoky flavor.

    6. Flavor Boosters: If you enjoy a bit of heat, consider adding crushed red pepper flakes to spice things up.

    Each of these variations encourages you to tailor the recipe to your taste, proving that easy dinner recipes can be classic yet adaptable.

    How to Store Easy Mediterranean Baked Fish Dinner Recipe: Best Practices

    To maximize the freshness and longevity of your Easy Mediterranean Baked Fish Dinner, follow these storage tips:

    1. Refrigeration: Allow the baked fish to cool completely before transferring to an airtight container. This will maintain its texture and flavors. When stored properly, leftover fish can remain fresh for 2-3 days in the refrigerator.

    2. Freezing: For longer storage, wrap the cooled fish tightly with plastic wrap and then securely in aluminum foil before placing it in a freezer-safe container. This option preserves quality for up to 2-3 months.

    3. Reheating: To reheat, it’s best to use the oven to maintain texture. Preheat the oven to 350°F (175°C) and bake the dish for 10-15 minutes until heated through. Adding a splash of lemon juice can help refresh the flavors.

    By implementing these best practices, you ensure that your Mediterranean baked fish remains just as delightful for a second meal.

    Nutritional Value of Easy Mediterranean Baked Fish Dinner Recipe

    When preparing an Easy Mediterranean Baked Fish Dinner, you’re not just enjoying a tasty dish; you’re also investing in your health. Here’s a breakdown of the approximate nutritional values per serving (based on a typical fish fillet with a serving of vegetables):

    • Calories: 300-350 (depending on the specific fish used)
    • Protein: 28g
    • Fat: 15g (with healthy monounsaturated fats from olive oil)
    • Carbohydrates: 10g
    • Fiber: 3g
    • Sugar: 5g
    • Sodium: 300mg (depends on the amount of salt added)

    Overall, this dish helps you intake necessary nutrients while managing caloric intake, making it a wholesome choice among easy dinner recipes.

    FAQs: Frequently Asked Questions About Easy Mediterranean Baked Fish Dinner Recipe

    Q1: Can I use frozen fish in this recipe?
    A1: Absolutely! Just ensure that the fish is fully thawed before cooking to ensure even baking.

    Q2: What vegetables can I add to this dish?
    A2: Feel free to incorporate zucchini, asparagus, or spinach, which can add both flavor and nutritional value to your dish.

    Q3: How can I make this recipe spicier?
    A3: Introduce crushed red pepper flakes or chopped jalapeños based on your heat preference for an added kick.

    Q4: Is this recipe suitable for meal prep?
    A4: Yes! You can prepare this dish in advance, store it in an airtight container in the refrigerator, and enjoy it during the week for quick meals.

    Q5: Can I use other types of fish?
    A5: Certainly! Fish varieties such as salmon, trout, or snapper can offer different flavors and textures. Adjust cooking times accordingly, as firmer fish may require slightly longer baking.

    By addressing these common queries, you provide reassurance to potential cooks looking to delve into making this Mediterranean delight.


    In conclusion, the Easy Mediterranean Baked Fish Dinner Recipe stands as a beacon of simplicity and flavor in the sea of everyday meals. With its customizable ingredients, health benefits, and ease of preparation, it’s a recipe worth embracing. So why wait? Gather your ingredients and indulge in a fresh, vibrant dish that nourishes not just your body but your soul!

  • Cozy Sardinian Herb Soup Healthy Recipe

    Cozy Sardinian Herb Soup Healthy Recipe

    Cozy Sardinian Herb Soup Healthy Recipe: A Tropical Delight

    Introduction to Cozy Sardinian Herb Soup Healthy Recipe

    Are you in search of simple and delicious soup recipes that are both nourishing and satisfying? Look no further than the Cozy Sardinian Herb Soup. This delightful recipe is not just any soup; it is a celebration of vibrant flavors and wholesome ingredients. Inspired by the culinary traditions of Sardinia, this herb soup is packed with health benefits while being exceptionally easy to prepare.

    This recipe shines as a healthy option for various dietary needs, making it perfect for busy parents, students, and health-conscious individuals alike. Whether you’re a cooking novice or a seasoned chef, you’ll find that this herb soup is simple yet sophisticated, delivering a rich flavor that warms the soul.

    Most importantly, it caters to everyone – it’s vegan, gluten-free, and low in calories, ensuring that you can enjoy a comforting bowl without compromising your dietary goals. This Cozy Sardinian Herb Soup is a versatile dish that’s also great for meal prep, making it ideal for a quick lunch or a cozy dinner after a long day.

    So, gather your ingredients and prepare to discover the rich, herbal flavors that can transform any meal into a delightful experience with minimal effort!

    Benefits and Advantages of Cozy Sardinian Herb Soup Healthy Recipe

    The Cozy Sardinian Herb Soup is a remarkable dish that stands out for several reasons. Here are some of its key benefits:

    1. Ease of Preparation: One of the primary attractions of this soup is its straightforward preparation. With minimal chopping and cooking time, you can have a delicious and nutritious meal ready in no time. It’s perfect for busy parents juggling work and family responsibilities, students on a time crunch, or anyone looking for a quick yet hearty meal.

    2. Health Benefits: This herb soup is loaded with nutritious ingredients. Fresh herbs such as parsley, basil, and oregano are rich in vitamins, antioxidants, and anti-inflammatory properties, making the soup health-boosting. Additionally, it’s low in calories and high in fiber, assisting in digestion and helping you feel full.

    3. Vegan and Gluten-Free: The recipe adheres to vegan and gluten-free dietary requirements without sacrificing flavor. This makes it an excellent choice for individuals with dietary restrictions, ensuring that everyone at your table can savor this delightful dish.

    4. Budget-Friendly: Using simple, accessible ingredients, this soup won’t break the bank. It’s a wonderful way to utilize leftover vegetables and herbs, making it not only healthy but also economical.

    5. Versatile: The Cozy Sardinian Herb Soup can be customized to suit individual tastes. You can easily adjust the seasoning, add proteins like tofu or chickpeas, or include seasonal veggies for added variety.

    6. Comforting and Warm: As the name suggests, this soup is cozy! On chilly days, there’s nothing quite like a warm bowl of soup to brighten your mood and bring comfort.

    Overall, this herb-infused soup is an ideal choice for anyone looking for nutritious and satisfying soup recipes that nourish the body and delight the palate.

    Ingredients Overview

    Essential Ingredients for Cozy Sardinian Herb Soup Healthy Recipe

    To create your Cozy Sardinian Herb Soup, you will need the following ingredients:

    • 2 tablespoons olive oil: A heart-healthy fat that adds richness and depth to the dish—considered vegan-friendly.
    • 1 medium onion, diced: This aromatic vegetable forms the base of your soup, providing flavor and sweetness.
    • 2 cloves of garlic, minced: Garlic enhances the soup with its robust flavor and offers numerous health benefits, including anti-inflammatory properties.
    • 4 cups vegetable broth: Offers a flavorful liquid base that is low-calorie and gluten-free.
    • 2 medium zucchinis, diced: Adding low-calorie content while providing bulk and nutrition.
    • 1 cup kale or spinach, chopped: Leafy greens pack in vitamins and minerals, contributing to the soup’s health benefits.
    • 1 cup fresh herbs (parsley, basil, oregano): Essential for the signature Sardinian flavor; these herbs boost the nutrient content.
    • Salt and pepper to taste: Simple seasonings that enhance the soup’s overall flavor.
    • Juice of 1 lemon: Brightens the soup and adds a refreshing acidity that balances the richness.

    For a vegan twist, use nutritional yeast for a cheesy flavor without dairy!

    Dietary Substitutions to Customize Your Cozy Sardinian Herb Soup Healthy Recipe

    The flexibility of this recipe makes it perfect for customization. Here are some substitutions you can consider:

    • Olive Oil: Substitute with avocado oil or coconut oil for a different flavor and health benefits.
    • Onion and Garlic: For those sensitive to alliums, consider using leeks or shallots for milder flavors.
    • Vegetable Broth: If you have homemade stock, feel free to use it, or for added protein, consider using a bean broth.
    • Zucchini: Substitute with diced carrots or sweet potatoes for an alternate texture and sweetness.
    • Kale/Spinach: Any leafy green will work, such as Swiss chard or collard greens.
    • Fresh Herbs: If fresh herbs aren’t available, dried herbs can be used; however, adjust quantities as dried herbs are more potent.
    • Additional Proteins: For a heartier soup, consider adding canned chickpeas or white beans, which also keep the dish vegan-friendly.

    With these substitutions, you can tailor the soup to accommodate your personal preferences or available ingredients.

    How to Prepare the Perfect Cozy Sardinian Herb Soup Healthy Recipe: Step-by-Step Guide

    Now that you have your ingredients ready, let’s dive into the step-by-step guide on how to prepare this delightful soup.

    1. Prepare the Base: Heat the olive oil in a large pot over medium heat. Add the diced onion and sauté until translucent, about 5 minutes. Stir in the minced garlic and cook for an additional minute until fragrant.

    2. Add the Vegetables: Stir in the diced zucchini and cook for another 5 minutes, allowing them to soften.

    3. Pour the Broth: Add the vegetable broth to the pot, bringing it to a simmer.

    4. Incorporate Leafy Greens: Once the broth is simmering, add chopped kale or spinach to the mixture. Let it cook for about 3-4 minutes until the greens are wilted and tender.

    5. Season the Soup: Add your fresh herbs (parsley, basil, oregano) to the pot. Season the mixture with salt and pepper to taste, remembering that the flavors will intensify as the soup simmers.

    6. Let it Simmer: Reduce the heat to low and allow the soup to simmer for about 15-20 minutes. This step helps the flavors meld together beautifully.

    7. Finish with Lemon Juice: Before serving, stir in the juice of one lemon, adjusting to taste. The acidity will elevate the flavors of the soup significantly.

    8. Serve: Ladle the soup into bowls and garnish with additional fresh herbs if desired. You can serve it fresh or allow it to cool before storing for later meals.

    This straightforward process ensures a delicious, healthy soup that fits well with various dietary restrictions. Feel free to adapt the steps as needed based on your ingredients or preferences!

    Mastering Cozy Sardinian Herb Soup Healthy Recipe: Advanced Tips and Variations

    While the Cozy Sardinian Herb Soup is delicious on its own, there are several advanced tips and variations to enhance your culinary experience:

    1. Blend for Creaminess: For a creamier texture, consider puréeing half the soup in a blender and then returning it to the pot. This creates a velvety soup without the need for cream.

    2. Add Protein: To make this soup more filling, include tofu cubes, chickpeas, or lentils. They contribute protein without adding meat, keeping it vegan.

    3. Spice it Up: If you enjoy a little heat, incorporate red pepper flakes or diced jalapeños for a kick.

    4. Cheesy Flavor: To add a cheesy note without dairy, sprinkle nutritional yeast into the soup while cooking.

    5. Herb Variations: Feel free to experiment with different herbs based on your preference or seasonality. Cilantro, dill, or even mint can offer delightful twists to the base flavor.

    6. Garnish Creatively: Top your soup with homemade croutons, a drizzle of olive oil, or even freshly ground black pepper for an extra layer of taste.

    By experimenting with these variations, you can make the Cozy Sardinian Herb Soup uniquely yours while mastering its delicious flavors.

    How to Store Cozy Sardinian Herb Soup Healthy Recipe: Best Practices

    Storing your Cozy Sardinian Herb Soup properly is essential for maintaining its taste and quality. Here are the best practices for refrigeration, freezing, and reheating:

    Refrigeration

    1. Allow the soup to cool to room temperature before transferring it to an airtight container. The soup can be stored in the fridge for 3-5 days.
    2. If you plan to consume it within this time frame, simple reheating on the stove or in the microwave will work well.

    Freezing

    1. To freeze the soup, ensure it is completely cooled before pouring it into freezer-safe containers or bags. Leave some space in the container for expansion as it freezes.
    2. The soup can typically be frozen for 2-3 months without losing its quality.
    3. Label the container with the date and contents for easier identification later.

    Reheating

    1. When ready to enjoy, thaw the soup in the refrigerator overnight or use the microwave for quicker thawing.
    2. Gently reheat it on the stove over medium heat, stirring occasionally until warmed through. If the soup is too thick after freezing, add a splash of vegetable broth or water to achieve the desired consistency.

    Following these storage methods ensures that your Cozy Sardinian Herb Soup remains fresh and delicious for future meals—perfect for meal prep or enjoying your favorite soup recipes anytime!

    Nutritional Value of Cozy Sardinian Herb Soup Healthy Recipe

    Understanding the nutritional content of your dishes is important for maintaining a balanced diet. Here’s a breakdown of the approximate nutritional value of the Cozy Sardinian Herb Soup per serving (based on the recipe serving four):

    • Calories: 150
    • Protein: 4 g
    • Fat: 6 g
    • Carbohydrates: 20 g
    • Fiber: 4 g
    • Sugars: 4 g
    • Sodium: 400 mg

    Nutritional Highlights

    • Low Calorie: At just 150 calories per serving, you can enjoy a hearty meal without worrying about caloric intake.
    • High Fiber: The fiber content sourced from vegetables and herbs promotes healthy digestion and aids in weight management.
    • Vitamins: Rich in vitamins A, C, and K primarily from leafy greens like kale and herbs, the soup contributes significantly to your daily nutritional intake.

    By including the Cozy Sardinian Herb Soup in your meal planning, you can relish a nourishing meal that caters to various dietary preferences while being low in calories and high in essential nutrients.

    FAQs: Frequently Asked Questions About Cozy Sardinian Herb Soup Healthy Recipe

    How can I adjust the flavor of the Cozy Sardinian Herb Soup?

    You can enhance or alter the flavor by adjusting herbs and spices. Adding more garlic, lemon juice, or even soy sauce can create depth. Don’t hesitate to experiment with your favorite seasonings!

    Is this soup suitable for meal prep?

    Absolutely! The Cozy Sardinian Herb Soup stores well in the refrigerator for up to five days and can be frozen for two to three months. This makes it excellent for meal prepping.

    Can I add meat to this soup?

    While the recipe is vegan-friendly, if desired, you can incorporate cooked chicken or sausage for an meaty option. Just ensure it’s fully cooked before adding it to the soup.

    What’s the best way to serve this soup?

    This soup pairs wonderfully with crusty bread for dipping. You can also serve it alongside a fresh salad for a complete meal.

    Are there any alternatives to using vegetable broth?

    Homemade stock or even a light chicken broth can be used as alternatives, providing a different flavor profile while still keeping the soup hearty.

    In conclusion, the Cozy Sardinian Herb Soup is the epitome of comfort food that checks all boxes for health, flavor, and versatility. Embrace the joy of cooking with this easy recipe and indulge in a bowl of warmth and nutrition, inviting friends and family to join you on this delightful flavor journey. Explore the world of soup recipes with this gem, and let it inspire your culinary adventures today!

  • Tasty Grinder Pasta Salad Easy Recipe

    Tasty Grinder Pasta Salad Easy Recipe

    Tasty Grinder Pasta Salad Easy Recipe: A Tropical Delight

    Introduction to Tasty Grinder Pasta Salad Easy Recipe

    Welcome to a delightful culinary adventure with the Tasty Grinder Pasta Salad Easy Recipe! This vibrant and nutritious dish is more than just a simple side; it’s a colorful experience meant to tantalize your taste buds while offering a range of health benefits. Packed with essential nutrients, this pasta salad is not only simple to prepare but also adaptable for various dietary preferences. Whether you’re a busy parent looking to feed your family a delicious meal or a student seeking a quick and filling dish, this recipe is for you.

    What sets this pasta salad apart is its versatility. It can easily be made vegan, gluten-free, or tailored to fit your dietary needs without sacrificing flavor. Imagine a bowl filled with flavorful ingredients, like crisp veggies and tender pasta, paired with a zesty dressing that brings everything together. You might just discover that it is the go-to recipe for any occasion—be it a picnic, a family gathering, or a casual weeknight dinner. Dive in and explore how to make this delightful dish that can cater to home cooks at every skill level.

    Benefits and Advantages of Tasty Grinder Pasta Salad Easy Recipe

    Why choose the Tasty Grinder Pasta Salad Easy Recipe over countless other options? Here are several compelling benefits that demonstrate why this dish is a smart choice for your meals:

    1. Simplicity of Preparation: One of the standout attributes of this pasta salad is its ease of preparation. With minimal cooking involved, even beginners can manage this recipe with confidence. The ingredient list is not overly complicated, making it accessible to those who may feel intimidated by elaborate cooking procedures.

    2. Health Benefits: The ingredients in this pasta salad are carefully selected to maximize nutritional value. Whole-grain pasta reduces refined carbohydrates, while the abundance of fresh vegetables adds fiber, vitamins, and minerals to your meal. Consequently, you’ll not only satisfy your hunger but also contribute positively to your well-being.

    3. Versatility for Various Diets: This pasta salad recipe can be easily adapted to cater to different dietary requirements. For instance, using gluten-free pasta or chickpea pasta as alternatives ensures that those with gluten sensitivities can enjoy it too. Likewise, this dish can be made vegan by swapping out any dairy components for plant-based options, thereby accommodating those on vegan diets.

    4. Ideal for Meal Prep: If you’re a busy parent, student, or working professional, you’ll appreciate that this recipe is perfect for meal prep. Make a large batch at the beginning of the week, and have nutritious lunches or quick dinners ready to go. Simply store the salad in an airtight container, and you’re set for several days of easy meals.

    5. Flavorful Satisfaction: Finally, the blend of textures and tastes in this salad is what makes it truly exceptional. The zesty dressing, combined with crunchy vegetables and tender pasta, creates a refreshing and satisfying dish that pleases the palate, making it an ideal option for entertaining guests or simply treating yourself.

    In summary, the Tasty Grinder Pasta Salad Easy Recipe combines health, simplicity, and flavor, making it an excellent choice for various occasions. Whether you’re a novice in the kitchen or an experienced home chef, you’ll find great joy in preparing this delightful dish!

    Ingredients Overview

    Essential Ingredients for Tasty Grinder Pasta Salad Easy Recipe

    Here’s what you need to create this delicious pasta salad and nourish your body at the same time!

    • Pasta (8 oz.): Choose whole-grain, gluten-free, or chickpea pasta for a healthier option.
    • Cherry Tomatoes (1 cup): Halved; they add a burst of sweetness and juiciness.
    • Cucumber (1 medium): Diced; it brings a refreshing crunch.
    • Bell Peppers (1 cup): Chopped; use a mix of colors for visual appeal.
    • Red Onion (1/2 medium): Finely diced; it adds a zesty flavor that elevates the dish.
    • Black Olives (1/2 cup): Sliced; they introduce a savory depth.
    • Feta Cheese (1/2 cup): Crumbled; (optional for vegan diets; can be substituted with a plant-based cheese).
    • Fresh Parsley (1/4 cup): Chopped; it enhances freshness and flavor.
    • Olive Oil (1/4 cup): For the dressing; use extra virgin for the best flavor.
    • Red Wine Vinegar (2 tbsp): Adds acidity and brightness to the salad.
    • Dijon Mustard (1 tsp): For a tangy kick in the dressing.
    • Salt and Pepper (to taste): Essential seasonings to balance flavors.

    This combination provides an exciting medley of flavors and textures. Plus, incorporating various colors reflects not only the dish’s health benefits but also its visual appeal, making it a feast for the eyes as well as the palate.

    Dietary Substitutions to Customize Your Tasty Grinder Pasta Salad Easy Recipe

    To cater to different dietary needs or if certain ingredients aren’t available, here are some easy substitutions:

    • Pasta Options: Substituting traditional pasta with gluten-free options such as quinoa pasta or spiralized vegetables like zucchini spirals can cater to gluten-sensitive individuals.
    • Dairy Alternatives: For a vegan-friendly version, swap out feta cheese for crumbled tofu seasoned with nutritional yeast or use a favorite dairy-free cheese brand.
    • Vegetable Variations: Feel free to mix up the veggies! You can use broccoli, carrots, or even kale for a different flavor and nutrient profile. Just be sure to combine vegetables that hold up well, so they don’t become soggy.
    • Herb Substitutions: If parsley is unavailable, fresh basil or cilantro can provide a wonderful twist to your dish.
    • Proteins Addition: For added protein, consider incorporating chickpeas or grilled chicken if you are not sticking strictly to vegan or vegetarian diets.

    These substitutions ensure that your Tasty Grinder Pasta Salad can be enjoyed by everyone, regardless of dietary restrictions or personal preferences.

    How to Prepare the Perfect Tasty Grinder Pasta Salad Easy Recipe: Step-by-Step Guide

    Creating the Tasty Grinder Pasta Salad is not only rewarding but also straightforward. Here are simple step-by-step instructions to guide you through the process:

    1. Prepare the Base: Start by boiling a large pot of water. Add a generous pinch of salt and then the pasta. Cook according to package directions until al dente. Drain and rinse under cold water to cool it down. This step is vital to prevent the pasta from becoming mushy.

    2. Chop Fresh Vegetables: While the pasta is cooking, wash and chop the cherry tomatoes, cucumber, bell peppers, and red onion. The freshness of these ingredients will add vibrant flavors and colors to your salad.

    3. Mix the Dressing: In a small bowl, whisk together olive oil, red wine vinegar, Dijon mustard, salt, and pepper. Taste and adjust the seasoning as needed. This homemade dressing is far better than store-bought and allows you to customize flavors.

    4. Combine Ingredients: In a large mixing bowl, add the cooled pasta, along with the chopped vegetables, black olives, and parsley. Stir gently to combine all ingredients without breaking the pasta.

    5. Add Cheese (Optional): If you’re using feta, sprinkle it over the salad now. Gently fold it into the mixture to avoid crumbling too much.

    6. Dress the Salad: Drizzle the prepared dressing over the salad. Begin with a conservative amount and toss gently to combine. You want the pasta salad to be coated without being swimming in dressing.

    7. Taste and Adjust: At this point, taste your pasta salad for seasoning. If it needs more flavor, add a pinch more salt, pepper, or even a dash of red wine vinegar.

    8. Refrigerate: Cover the salad with plastic wrap or transfer it to an airtight container. Refrigerate for at least 30 minutes (or up to a few hours) to allow flavors to meld together. This resting period makes a significant difference in taste.

    9. Serve and Enjoy: Before serving, give the salad a gentle toss to redistribute any dressing that may have settled at the bottom. Garnish with extra parsley or cheese if desired.

    10. Store Leftovers: If there are any leftovers, store the pasta salad in the fridge for up to three days. It makes for a convenient lunch option!

    This straightforward method results in a vibrant and flavorful pasta salad that can cater to many tastes and dietary needs.

    Mastering Tasty Grinder Pasta Salad Easy Recipe: Advanced Tips and Variations

    To take your Tasty Grinder Pasta Salad Easy Recipe to the next level, consider these additional tips and variations that enhance the flavor and nutrition of your dish:

    1. Experiment with Different Pasta Shapes: While rotini or penne works well, try using farfalle (bowtie pasta) for a fun twist. The shape can affect the texture and presentation, making every bite enjoyable.

    2. Mix Up the Dressings: If you’re looking for a different flavor profile, consider swapping out the dressing entirely. A basil pesto or a sesame ginger dressing can impart a unique flair to your pasta salad.

    3. Toast the Nuts: For an added crunch, consider toasting some nuts, like almonds or walnuts, and tossing them in just before serving. They provide healthy fats and a satisfying texture.

    4. Incorporate Seasonal Ingredients: Take advantage of what’s in season! For instance, in the summer, add grilled corn and diced fresh peaches for a fruity twist. In the fall, roasted butternut squash can add warmth and depth.

    5. Spice It Up: If you enjoy heat, consider adding diced jalapeños or a pinch of red pepper flakes to the dressing for a zesty kick.

    6. Add Fruits: Sliced avocados or even berries like strawberries can add a fresh, slightly sweet element to the salad, balancing its savory components.

    By using these tips, you create a dynamic and exciting dish that keeps your palate satisfied and curious.

    How to Store Tasty Grinder Pasta Salad Easy Recipe: Best Practices

    Storing your Tasty Grinder Pasta Salad correctly ensures that leftovers stay fresh and flavorful. Here’s how to do it effectively:

    1. Refrigeration: Store the pasta salad in an airtight container in the refrigerator. It’s best consumed within three days, after which vegetables may lose their crispness, and pasta may become mushy.

    2. Freezing: While it’s not typically recommended to freeze pasta salad because of its creamy and fresh ingredients, you can freeze portions without dressing to extend its shelf life. When you’re ready to enjoy it, thaw in the refrigerator overnight and add fresh dressing and veggies before serving.

    3. Serving Suggestions: If you’re planning to serve this salad at a gathering, consider keeping the dressing separate until just before serving to keep the pasta and veggies crisp.

    Following these storage tips allows you to enjoy your pasta salad over several days without compromising on quality.

    Nutritional Value of Tasty Grinder Pasta Salad Easy Recipe

    Understanding the nutritional value of your meals is essential for maintaining a balanced diet. Here’s a breakdown of the approximate nutritional content per serving (1 cup) of the Tasty Grinder Pasta Salad if prepared as outlined:

    • Calories: 280
    • Protein: 8g
    • Carbohydrates: 40g
    • Dietary Fiber: 5g
    • Total Fat: 12g
    • Saturated Fat: 3.5g
    • Cholesterol: 10mg (if feta cheese is included)
    • Sodium: 320mg

    This pasta salad is an excellent source of vitamins and minerals from the fresh vegetables, while the whole-grain pasta provides complex carbohydrates for sustained energy. With healthy fats from olive oil and the potential for protein from added ingredients like chickpeas or grilled chicken, this dish can easily fit into a range of nutritional diets.

    FAQs: Frequently Asked Questions About Tasty Grinder Pasta Salad Easy Recipe

    1. Can I make this pasta salad ahead of time?

    Yes! One of the advantages of this pasta salad is that it can be prepared ahead of time. In fact, it tastes better after a few hours in the fridge as the flavors meld together.

    2. Is there a gluten-free version of this pasta salad?

    Absolutely! You can substitute traditional pasta with gluten-free pasta options such as quinoa or brown rice pasta. This allows those with gluten sensitivities to enjoy the recipe fully.

    3. What can I substitute for feta cheese?

    If you’re looking for a dairy-free option, use crumbled tofu seasoned with nutritional yeast or your favorite plant-based cheese.

    4. Can I add protein to this salad?

    Certainly! Grilled chicken, canned chickpeas, or even shrimp can easily be added to the pasta salad for an extra protein boost.

    5. How long will leftovers last in the fridge?

    Stored properly in an airtight container, leftovers can typically last up to three days. However, for the freshest taste and texture, enjoy it within the first two days.

    6. Are there any variations I can try?

    Yes! Feel free to experiment with various vegetables, dressings, or even fruits like avocados. Seasonal ingredients can transform this salad into something new and exciting.

    7. Can I serve this salad warm?

    This recipe is best served cold or at room temperature, but if you prefer, you can slightly warm the pasta before mixing in the additional ingredients.

    Embrace the vibrant world of flavors and textures by trying out the Tasty Grinder Pasta Salad Easy Recipe! Enjoy experimenting with its ingredients or relish it as-is; either way, you’ll have a delightful dish that satisfies your hunger while keeping health in mind.

  • The Best Chocolate Chip Cookies Recipe

    The Best Chocolate Chip Cookies Recipe

    The Best Chocolate Chip Cookies Recipe: A Tropical Delight

    Introduction to The Best Chocolate Chip Cookies Recipe

    When it comes to comfort food, few things can rival the classic appeal of chocolate chip cookies. These delightful treats have a unique place in our hearts and kitchens, embodying the balance between sweet, chewy, and slightly crisp. The Best Chocolate Chip Cookies Recipe not only captures that essence but also presents an accessible, simple, and versatile way to indulge in this beloved dessert.

    This recipe shines, making it a popular choice for home cooks, busy parents, students, and even health-conscious individuals. Crafted with wholesome ingredients, the cookies incorporate minimal sugar and can easily adapt to fit vegan or gluten-free diets. The beauty of this chocolate chip cookie recipe lies in its flexibility; you can customize it according to your tastes and dietary preferences.

    With a few basic ingredients and straightforward instructions, whipping up these cookies becomes a delightful experience for everyone involved. Whether you’re baking for a gathering, surprising a loved one, or simply enjoying a cozy evening at home, chocolate chip cookies can be your perfect partner. Join us in exploring this beautiful recipe and discover how easy and rewarding it is to make the best cookies right in your kitchen!

    Benefits and Advantages of The Best Chocolate Chip Cookies Recipe

    The Best Chocolate Chip Cookies Recipe is a standout for numerous reasons. First and foremost, it encourages inclusivity in the kitchen. As a versatile recipe, it accommodates various dietary needs—be it gluten-free, vegan, or low-calorie options—without compromising on flavor. By using alternative ingredients, you can satisfy the cravings of friends and family, ensuring that everyone can enjoy a sweet treat.

    One of the key advantages of this recipe is its simplicity. With just a handful of ingredients, you won’t find yourself overwhelmed. In fact, for busy parents or working professionals, this chocolate chip cookie recipe offers a quick solution to satisfy snack cravings without an elaborate kitchen adventure. Besides, kids love to participate, making it a fun family activity.

    Health benefits stand out as another significant factor. By choosing the right ingredients, such as whole-grain flour or natural sweeteners like coconut sugar, you can create cookies that not only please the palate but also provide nourishment. You and your family can indulge without the guilt often associated with traditional baked goods.

    Finally, this recipe stands out due to its adaptability. You can easily modify it to explore exciting variations like adding nuts, spices, or even fruits. This aspect allows bakers to express creativity and cater to personal preferences, transforming simple chocolate chip cookies into a delightful experience every time.

    Ingredients Overview

    Essential Ingredients for The Best Chocolate Chip Cookies Recipe

    To make the most delightful chocolate chip cookies, you’ll need the following essential ingredients:

    • All-Purpose Flour (2 cups): This forms the base of your cookies, providing structure.
    • Baking Soda (1 teaspoon): This ingredient helps the cookies rise and become fluffy.
    • Salt (½ teaspoon): Enhances the flavor and balances sweetness.
    • Unsalted Butter (1 cup, melted): Adds richness and moisture. For a healthier version, substitute with coconut oil or vegan butter for a dairy-free option.
    • Brown Sugar (¾ cup): This sugar gives the cookies a deeper flavor and chewy texture. Substitute with coconut sugar for a low-calorie approach.
    • Granulated Sugar (¾ cup): Provides sweetness and helps achieve the perfect cookie crisp.
    • Vanilla Extract (1 tablespoon): Enhances the flavors of your cookies.
    • Eggs (2 large): Binds all ingredients together. For a vegan alternative, use aquafaba (3 tablespoons) or flaxseeds (1 tablespoon ground flaxseed mixed with 2.5 tablespoons water).
    • Chocolate Chips (2 cups): The star of the show! Dark chocolate chips are a healthier option, while carob chips can serve as a substitute for those avoiding caffeine.

    Dietary Substitutions to Customize Your The Best Chocolate Chip Cookies Recipe

    To ensure this chocolate chip cookie recipe accommodates various dietary needs, here are some suggested substitutions:

    1. Gluten-Free Option: Replace all-purpose flour with a gluten-free flour blend. Make sure the blend contains xanthan gum, or add ½ teaspoon to help with structure.

    2. Vegan Option: Substitute eggs with flaxseed or chia egg (1 tablespoon of flaxseed/chia seeds mixed with 3 tablespoons of water, set aside until gel-like) and use vegan butter or coconut oil instead of unsalted butter.

    3. Low-Calorie Option: Use a sugar substitute like stevia or erythritol. Additionally, opt for reduced-fat margarine or applesauce in place of butter.

    4. Nut-Free Option: Ensure that any chocolate chips used are nut-free, and you can enhance flavor by adding spices such as cinnamon or nutmeg instead.

    By implementing these thoughtful substitutions, you can enjoy the deliciousness of chocolate chip cookies guilt-free!

    How to Prepare the Perfect The Best Chocolate Chip Cookies Recipe: Step-by-Step Guide

    Creating mouthwatering chocolate chip cookies is easier than you might think! Follow this step-by-step guide to bake the best cookies you’ve ever had.

    1. Preheat the Oven: Begin by preheating your oven to 350°F (175°C). This step ensures that your cookies bake evenly to perfection.

    2. Prepare Your Baking Sheet: Line a baking sheet with parchment paper. This makes transferring the cookies easy and prevents sticking.

    3. Mix Dry Ingredients: In a medium bowl, whisk together 2 cups of all-purpose flour, 1 teaspoon of baking soda, and ½ teaspoon of salt. Set this mixture aside for later.

    4. Cream Butter and Sugars: In a large bowl, combine 1 cup of melted unsalted butter, ¾ cup brown sugar, and ¾ cup granulated sugar. Using an electric mixer, beat until the mixture becomes creamy and light in color, about 2 minutes.

    5. Add Wet Ingredients: To the butter-sugar mixture, add 1 tablespoon of vanilla extract and 2 large eggs (or your vegan substitute). Beat until fully incorporated.

    6. Incorporate Dry Ingredients: Gradually add the dry mixture to the wet mixture, mixing on low speed until just combined. Avoid over-mixing, as this can lead to tough cookies.

    7. Fold in Chocolate Chips: Gently fold in 2 cups of chocolate chips with a spatula or wooden spoon, ensuring they are evenly distributed throughout the dough.

    8. Scoop the Dough: Using a cookie scoop or tablespoon, portion out the dough onto the prepared baking sheet, leaving enough space between each cookie for them to spread as they bake.

    9. Bake: Place the cookie sheet in the preheated oven and bake for 10-12 minutes, or until the edges are golden brown, and the centers are slightly undercooked.

    10. Cool on Wire Racks: Once baked, remove the cookies from the oven and allow them to cool on the baking sheet for 5 minutes before transferring to wire racks to cool completely.

    11. Store: Once cooled, enjoy these delectable cookies right away! For long-term storage, place them in an airtight container.

    The adaptability of this chocolate chip cookie recipe allows you to tweak the ingredients or baking time based on dietary preferences, making it a versatile treat!

    Mastering The Best Chocolate Chip Cookies Recipe: Advanced Tips and Variations

    For those ready to elevate their cookie game, here are some advanced tips and delightful variations to consider:

    • Brown Butter Cookies: For a nutty flavor, brown the butter before mixing it with sugars. Simply heat the butter on medium heat, stirring constantly until it turns golden brown and smells nutty. Allow it to cool slightly before continuing with the recipe.

    • Chill the Dough: Chilling the dough for 30 minutes to 2 hours can enhance the flavor and texture of your cookies. It allows the flavors to meld, resulting in a richer taste.

    • Add Nuts: For a delightful crunch, fold in 1 cup of your favorite nuts, such as walnuts or pecans, along with the chocolate chips.

    • Mix in Other Flavors: Experiment with different types of chocolate chips (milk, dark, white, or even butterscotch chips), or add a teaspoon of espresso powder for a subtle coffee flavor that enhances the chocolate.

    • Stuffed Cookies: Try stuffing your cookies by placing a chocolate piece in the center of the dough ball. This creates a melty, gooey surprise in every bite.

    These tips can transform a classic recipe into unique culinary creations, ensuring that the chocolate chip cookies never become monotonous!

    How to Store The Best Chocolate Chip Cookies Recipe: Best Practices

    Proper storage of your chocolate chip cookies is essential to preserve their taste and texture. Here are some best practices for storing these delightful treats:

    1. Room Temperature Storage: Store cooled cookies in an airtight container on the counter for 3-5 days. This helps retain their freshness, so you can easily enjoy them any time.

    2. Refrigeration: If you’d like to extend their life, consider placing the cookies in the refrigerator. Just keep in mind that chilled cookies may become slightly harder, so let them sit at room temperature for a few minutes before enjoying.

    3. Freezing: For longer storage, freeze your cookies. Place individual cookies in an even layer on a baking sheet and freeze until solid. Then, transfer them to a freezer-safe container or bag, where they’ll last for up to 3 months. When ready to eat, simply thaw them at room temperature or reheat in the microwave for a few seconds.

    These storage techniques will help ensure your cookies stay fresh and delicious, allowing you to savor each bite long after baking.

    Nutritional Value of The Best Chocolate Chip Cookies Recipe

    Understanding the nutritional value of your cookies can help you make informed choices. Below is a rough estimate of the nutritional content per cookie, based on a batch yielding 24 cookies made with conventional ingredients:

    • Calories: 150-200
    • Total Fat: 8-10g
    • Saturated Fat: 5g
    • Cholesterol: 15-25mg
    • Sodium: 90-120mg
    • Total Carbohydrates: 22-25g
    • Dietary Fiber: 1g
    • Sugars: 10-12g
    • Protein: 2-3g

    Keep in mind that these values can vary based on ingredient substitutions and add-ins. For example, using coconut sugar or reducing the amount of sugar can decrease the total calories and sugar content.

    Feel free to explore variations with whole grain flour or use dark chocolate chips to enhance antioxidants and overall health benefits.

    FAQs: Frequently Asked Questions About The Best Chocolate Chip Cookies Recipe

    Q1: Can I use margarine instead of butter?
    Absolutely! You can substitute margarine for butter in equal amounts if you’re looking for a dairy-free option.

    Q2: How do I make my chocolate chip cookies chewy?
    To achieve chewiness, be careful not to overbake your cookies. Removing them from the oven when they are slightly underbaked allows them to retain moisture as they cool.

    Q3: Can I freeze the cookie dough?
    Yes, you can freeze the cookie dough. Scoop the dough into balls and freeze them on a baking sheet. Once solid, transfer them to a freezer bag. When you are ready to bake, you can bake them directly from the freezer—just add a couple of minutes to the baking time.

    Q4: Are there any sugar substitutes that work well for this recipe?
    Sure! Coconut sugar, stevia, or erythritol are excellent sugar substitutes. They can help reduce calorie content while maintaining sweetness.

    Q5: How can I increase the flavor profile?
    Add spices like cinnamon, a pinch of nutmeg, or even espresso powder to amplify the flavor and give your chocolate chip cookies a unique twist.

    Conclusion

    Baking The Best Chocolate Chip Cookies is a delightful experience, allowing you to gather friends, family, or even enjoy some quiet moments by yourself. The versatility of this recipe means you can cater to various tastes and dietary choices while creating a luxurious treat that is both satisfying and comforting. Whether you choose the classic version or experiment with unique variations, chocolate chip cookies are bound to bring joy to your kitchen. So gather your ingredients, preheat that oven, and embark on the sweet journey to cookie perfection! Happy baking!

  • The Best Chewy Chocolate Chip Cookies Recipe

    The Best Chewy Chocolate Chip Cookies Recipe

    The Best Chewy Chocolate Chip Cookies Recipe: A Tropical Delight

    Introduction to The Best Chewy Chocolate Chip Cookies Recipe

    There’s something inexplicably comforting about biting into a warm, chewy chocolate chip cookie. The sweet aroma fills your kitchen, inviting loved ones to gather around and savor each bite. You’ve just stumbled upon the ultimate recipe for chocolate chip cookies that not only satisfies your sweet tooth but also excels in simplicity and health benefits.

    This delectable recipe offers a perfect balance of rich flavor and delightful texture, making it an ideal choice for home cooks, busy parents, students, and anyone looking to indulge their culinary passion without spending hours in the kitchen. What makes this iteration stand out is its versatility – you can easily customize it to suit various dietary needs. Whether you’re looking for a vegan-friendly version or a gluten-free option, this recipe provides simple substitutions to help you create delicious chocolate chip cookies that everyone can enjoy.

    Baking doesn’t need to be complicated or time-consuming. With straightforward steps and readily available ingredients, this recipe will inspire novice bakers and seasoned chefs alike. Join me in creating these scrumptious cookies that are sure to impress friends and family. Plus, they make a great treat for any occasion, from weekend get-togethers to midnight snacks!


    Benefits and Advantages of The Best Chewy Chocolate Chip Cookies Recipe

    Baking the best chocolate chip cookies at home comes with numerous benefits that extend beyond simply satisfying your sweet cravings. Here’s why this recipe should be your go-to when you want a reliable and delicious treat:

    1. Simplicity in Preparation: This recipe features easy-to-follow instructions, making it perfect for beginner bakers or those with limited time. With just a handful of ingredients and a few steps, you can have freshly baked cookies hot from the oven in no time.

    2. Health Benefits: While cookies are often seen as indulgent treats, this recipe allows you to incorporate healthier ingredients that can make them a guilt-free dessert option. You can use whole grain flour instead of all-purpose flour, natural sweeteners like honey or maple syrup, and high-quality chocolate to enhance the nutritional profile of your chocolate chip cookies.

    3. Dietary Adaptability: Whether you’re following a vegan diet, need to avoid gluten, or simply want to lower the calorie count, this recipe can easily be adapted. I’ll share alternatives that you can use to make these cookies fit your dietary needs without sacrificing taste or texture.

    4. Sense of Accomplishment: There’s immense satisfaction that comes from baking a batch of chocolate chip cookies from scratch. The smell of baking chocolate and the joy of sharing with family and friends make for delightful memories.

    5. Versatility: This recipe serves as a base for numerous variations. You can add nuts, dried fruits, or even experiment with different types of chocolate for unique flavor combinations.

    In a world where convenience often takes precedence, creating your own batch of cookies combines enjoyment and creativity. You’ll not only fill your home with a cozy fragrance but also experience the joy that comes from baking and sharing your personal culinary triumphs.


    Ingredients Overview

    Essential Ingredients for The Best Chewy Chocolate Chip Cookies Recipe

    Here’s a detailed breakdown of the ingredients you’ll need to create the best chewy chocolate chip cookies. Each ingredient plays a vital role in achieving that perfect texture and taste.

    1. All-Purpose Flour (2 ¼ cups): The foundation of the cookies, all-purpose flour gives them structure. For a gluten-free option, use almond flour or a gluten-free flour blend.

    2. Baking Soda (1 tsp): This leavening agent helps the cookies rise and gives them that soft, chewy interior.

    3. Salt (½ tsp): A pinch of salt enhances the sweetness of the chocolate and balances flavors beautifully.

    4. Unsalted Butter (1 cup, softened): Butter not only adds flavor but also contributes to the cookie’s chewy texture. For a vegan alternative, substitute with coconut oil or a dairy-free butter substitute.

    5. Brown Sugar (¾ cup): Packed brown sugar retains moisture, lending a rich flavor. You can also use coconut sugar for a less refined option.

    6. Granulated Sugar (½ cup): The combination of both sugars gives the cookies a delightful sweetness while allowing them to crisp up perfectly.

    7. Vanilla Extract (2 tsp): This adds depth to the flavor and enhances the overall taste of the cookies.

    8. Eggs (2 large): Eggs help bind the ingredients, contributing to the chewy texture. For a vegan substitute, use flaxseed meal or an egg replacer.

    9. Chocolate Chips (2 cups): The hero of this recipe! Use semi-sweet, dark, or even vegan chocolate chips based on your preference.

    10. Optional Add-ins: Consider adding chopped nuts, such as walnuts or pecans, or swirl in some peanut butter or butterscotch chips to create your own unique twist.

    Dietary Substitutions to Customize Your The Best Chewy Chocolate Chip Cookies Recipe

    Not only is this recipe adaptable to various palates, but it also accommodates dietary needs. Here are some suggested substitutions to cater to different preferences:

    • Gluten-Free: Use a blend of gluten-free flours, such as almond flour and coconut flour, combined with xanthan gum to mimic the elasticity of traditional flour.

    • Vegan: Substitute butter with a margarine alternative and replace eggs with flaxseed eggs (1 tablespoon of flaxseed meal mixed with 2.5 tablespoons of water per egg).

    • Low-Calorie: Swap out the sugars for stevia or erythritol, and use a light butter substitute. Alternatively, reduce the amount of chocolate chips to cut back on calories without losing flavor.

    • Nut-Free: Omit any nuts in the mix or choose sunflower seeds as a crunchy alternative for those with allergies.

    By using these substitutions, you can create a recipe that aligns perfectly with your dietary needs while still enjoying the classic taste of chocolate chip cookies.


    How to Prepare the Perfect The Best Chewy Chocolate Chip Cookies Recipe: Step-by-Step Guide

    Now that we understand the ingredients, it’s time to roll up our sleeves and dive into the baking process. Follow this step-by-step guide to create the perfect chocolate chip cookies:

    1. Preheat the Oven: Start by preheating your oven to 350°F (175°C). This ensures that the cookies bake evenly.

    2. Prepare the Baking Sheet: Line a baking sheet with parchment paper or a silicone baking mat to prevent the cookies from sticking and to ensure even baking.

    3. Mix Dry Ingredients: In a mixing bowl, combine the all-purpose flour, baking soda, and salt. Whisk together until well combined. This helps to evenly distribute the baking soda and salt throughout the flour.

    4. Cream the Butter and Sugars: In a separate large bowl, use an electric mixer to cream together the softened unsalted butter, brown sugar, and granulated sugar until the mixture is light and fluffy. This usually takes about 3-5 minutes.

    5. Add Eggs and Vanilla: Add the eggs, one at a time, to the butter-sugar mixture, mixing well after each addition. Follow up with the vanilla extract and beat until fully combined.

    6. Incorporate Dry Ingredients: Gradually add the dry ingredient mixture to the wet mixture. Stir just until combined; avoid over-mixing, as this can result in dense cookies.

    7. Fold in Chocolate Chips: Gently fold in the chocolate chips using a spatula or wooden spoon, ensuring they are evenly distributed throughout the dough.

    8. Scoop the Dough: Use a cookie scoop or tablespoon to portion out the dough onto the prepared baking sheet, leaving enough space between each cookie as they will spread while baking.

    9. Bake the Cookies: Place the baking sheet in the preheated oven and bake for 10-12 minutes or until the edges are golden brown and the centers look slightly undercooked. This will help keep them chewy.

    10. Cool the Cookies: Remove the cookies from the oven and let them cool on the baking sheet for 5 minutes before transferring them to a wire rack to cool completely.

    11. Enjoy: Once they’re cooled, dig in and savor your delicious, homemade chocolate chip cookies!

    Feel free to adjust the baking time based on your oven’s characteristics or your preferred level of chewiness. Remember, cookies continue to cook slightly after you take them out.


    Mastering The Best Chewy Chocolate Chip Cookies Recipe: Advanced Tips and Variations

    To take your cookie-making skills to the next level, here are some advanced tips and creative variations to try:

    1. Chill the Dough: For even chewier cookies, consider chilling the dough for at least an hour before baking. This allows the flavors to meld and can enhance texture.

    2. Experiment with Mix-ins: Besides chocolate chips, try adding dried cranberries, toffee bits, or even sea salt on top before baking for an elevated flavor experience.

    3. Vary Chocolate Types: Don’t be afraid to mix different types of chocolate – dark, milk, white, or even a combination of chips and chunks for a delightful texture.

    4. Add Flavor Boosts: Spice things up by incorporating a dash of cinnamon or coffee granules into the dough for a unique twist on the usual cookie flavor profile.

    5. Create Stuffed Cookies: Try stuffing your cookies with peanut butter, Nutella, or chocolate ganache for a decadent treat that takes cookie-making to new heights.

    By incorporating these advanced tips and variations into your baking routine, you’ll not only master the basic chocolate chip cookies but also create endless possibilities that will wow your family and friends.


    How to Store The Best Chewy Chocolate Chip Cookies Recipe: Best Practices

    Proper storage is essential to keep your cookies fresh and chewy. Here are the best practices for storing your homemade chocolate chip cookies:

    1. Room Temperature: Once cooled, store your cookies in an airtight container lined with parchment paper. This will keep them soft for up to a week at room temperature.

    2. Refrigeration: If you want your cookies to last longer, you can refrigerate them. Just ensure they’re in a well-sealed container to prevent drying out. They can stay good for about two weeks in the fridge.

    3. Freezing: To preserve your cookies for an extended period, freezing is the best method. Place the cookies in a single layer in a zip-top freezer bag or container, separating layers with parchment paper. They can be frozen for up to 3 months.

    4. Reheating: When you’re ready to enjoy frozen or refrigerated cookies, let them sit at room temperature for five minutes. Alternatively, you can microwave them for about 10-15 seconds to restore their softness.

    By following these storage tips, you can enjoy your homemade chocolate chip cookies whenever the craving strikes!


    Nutritional Value of The Best Chewy Chocolate Chip Cookies Recipe

    Understanding the nutritional value of your homemade chocolate chip cookies can help you enjoy them guilt-free. The nutritional content may vary based on the specific ingredients you choose, but here’s a general idea for one cookie (based on a standard recipe):

    • Calories: 150
    • Total fat: 7g (Saturated fat: 4g, Trans fat: 0g)
    • Cholesterol: 25mg
    • Sodium: 100mg
    • Total carbohydrates: 22g (Dietary fiber: 1g, Sugars: 10g)
    • Protein: 2g

    Health Considerations:

    • Fiber Intake: Incorporating whole grain flour can increase the fiber content.
    • Sugar Alternatives: Using natural sweeteners or reducing sugar can improve the overall health profile.
    • Fat Content: Opting for healthier fats, like coconut oil or nut butters, may enhance nutritional value.

    Being informed about the nutritional profile allows you to enjoy these chocolate chip cookies without compromising your dietary goals!


    FAQs: Frequently Asked Questions About The Best Chewy Chocolate Chip Cookies Recipe

    Q: Can I substitute the butter with margarine?
    A: Yes, you can use margarine as a substitute for butter in the recipe.

    Q: What can I use instead of eggs for vegan cookies?
    A: Flaxseed meal or chia seeds mixed with water can serve as a great egg substitute in vegan recipes.

    Q: How can I make my cookies chewier?
    A: To achieve a chewier consistency, you can increase the brown sugar ratio, chill the dough before baking, or slightly underbake them.

    Q: Can I freeze the cookie dough?
    A: Absolutely! You can scoop out the dough onto a baking sheet to freeze individual cookie portions. Once frozen, transfer to a zip-top freezer bag for up to three months.

    Q: How long can I store baked cookies?
    A: Baked cookies can typically be stored at room temperature in an airtight container for up to a week.

    Enjoy experimenting with this fantastic recipe for chocolate chip cookies and happy baking!

  • Easy Slow Cooker Mediterranean Chicken Dinner

    Easy Slow Cooker Mediterranean Chicken Dinner

    Easy Slow Cooker Mediterranean Chicken Dinner: A Tropical Delight

    Introduction to Easy Slow Cooker Mediterranean Chicken Dinner

    Welcome to a culinary journey that promises to simplify your weeknight dinners while delivering vibrant Mediterranean flavors! The Easy Slow Cooker Mediterranean Chicken Dinner is a must-try for anyone seeking delicious and wholesome meal options. As part of a collection of engaging crockpot recipes, this dish shines with its simplicity and health benefits.

    Imagine coming home to the enticing aroma of tender chicken simmered with colorful vegetables, olives, and aromatic herbs—all done effortlessly in your slow cooker! Not only is this recipe easy to prepare, but it also accommodates various dietary preferences. Whether you are looking for a gluten-free feast or a low-calorie dinner, this dish fits the bill perfectly.

    Moreover, preparing meals in a slow cooker allows you to retain the essential nutrients of your ingredients, promoting healthier eating habits. You can savor this dish with confidence, knowing it’s crafted to nourish both the body and the soul. From busy parents juggling family schedules to students looking for quick meal prep, and working professionals in need of easy dinner solutions, this recipe caters to everyone.

    So, gather your ingredients and get ready to create a Mediterranean-inspired meal that elevates your dining experience effortlessly!

    Benefits and Advantages of Easy Slow Cooker Mediterranean Chicken Dinner

    The Easy Slow Cooker Mediterranean Chicken Dinner is not just another recipe; it’s a celebration of flavors and ease, making it a standout choice among other crockpot recipes. Below are some key benefits that set it apart:

    1. Simplicity of Preparation

    One of the most attractive features of this slow cooker dish is its straightforward preparation method. With a few simple steps, you can surf through your busy day while your slow cooker does the heavy lifting. Toss in your ingredients, set the timer, and let the magic happen as it cooks slowly to enhance the flavors.

    2. Health Benefits

    This Mediterranean recipe is packed with nutritious ingredients. Lean chicken breast is rich in protein while an array of fresh vegetables—including bell peppers, tomatoes, and spinach—adds dietary fiber and a wealth of vitamins and minerals. Furthermore, olive oil provides heart-healthy fats, making it a balanced meal option for weight watchers and health enthusiasts alike.

    3. Customizable and Versatile

    Another advantage of this dish is its adaptability. You can easily modify it to cater to specific dietary needs. Whether opting for a veggie-based version for your plant-based friends or swapping chicken for turkey for a leaner alternative, this recipe offers endless possibilities.

    4. Ideal for Meal Prep

    The Easy Slow Cooker Mediterranean Chicken Dinner is perfect for meal prep. You can whip up a big batch on Sunday and enjoy it throughout the week, making it ideal for busy parents, professionals, and students. This not only saves time but ensures you have nutritious meals ready to go!

    5. Family-Friendly Appeal

    With its mild flavors and colorful presentation, this dish is sure to please even the pickiest eaters. It’s a fantastic way to introduce children to Mediterranean cuisine, showcasing a range of ingredients that can spark curiosity and adventurous eating.

    In summary, when considering meal options, this dish emerges as a fabulous choice due to its simplicity, health benefits, and versatility. It’s not merely about feeding the family; it’s about indulging in an enjoyable cooking experience.

    Ingredients Overview

    Essential Ingredients for Easy Slow Cooker Mediterranean Chicken Dinner

    To create this delightful dish, you will need the following ingredients, ensuring a flavor-packed experience:

    • 2 lbs boneless, skinless chicken breasts: This serves as the protein base, providing nutrients and flavor.
    • 1 cup cherry tomatoes, halved: These tomatoes add freshness and a hint of sweetness.
    • 1 bell pepper (any color), diced: Adds crunch and complements the flavors beautifully.
    • 1 medium onion, chopped: Provides a savory foundation.
    • 2 cloves garlic, minced: Enhances the dish with aromatic flavor.
    • 1 cup low-sodium chicken broth: Keeps the chicken moist and flavorful while adding depth to the dish.
    • 1/4 cup Kalamata olives, pitted and halved: Contributes authentic Mediterranean flavors.
    • 2 tsp dried oregano or Italian seasoning: Brings the essence of the Mediterranean to your table.
    • 1/4 cup olive oil: A heart-healthy fat that adds richness.
    • Salt and pepper to taste: Enhances the overall flavor presentation.
    • Optional: Fresh parsley for garnish: Adds a pop of color and brightness to the dish.

    Dietary Options

    • Vegan Option: Substitute chicken with chickpeas or a plant-based protein.
    • Gluten-free: This recipe is inherently gluten-free, making it suitable for those with gluten sensitivities.
    • Low-calorie: Skipping olive oil or using less chicken can help you reduce calorie intake while still enjoying flavor.

    Dietary Substitutions to Customize Your Easy Slow Cooker Mediterranean Chicken Dinner

    Customizing the Easy Slow Cooker Mediterranean Chicken Dinner to fit various dietary preferences is as simple as making a few substitutions. Here are some suggestions:

    1. For a Vegetarian or Vegan Delight:
    2. Replace the chicken with canned chickpeas or a plant-based protein like tofu or tempeh. Make sure to season adequately to infuse the flavors into the plant base.

    3. Gluten-Free Needs:

    4. Since all ingredients are naturally gluten-free, there’s no need for any changes. Just ensure your chicken broth is labeled gluten-free, as some brands might contain gluten.

    5. Lower-Calorie Option:

    6. Opt for skinless chicken thighs instead of breast for a juicier texture but keep an eye on portion sizes. (Keep in mind, adjustments may increase calorie count slightly but can offer more flavor.)

    7. For Those Avoiding Certain Vegetables:

    8. If bell peppers aren’t your favorite, consider adding zucchini, yellow squash, or carrots, which will complement the other flavors while still achieving that beautiful Mediterranean essence.

    By considering these substitutions, everyone can enjoy the Easy Slow Cooker Mediterranean Chicken Dinner while catering to their dietary requirements—all without sacrificing on taste.

    How to Prepare the Perfect Easy Slow Cooker Mediterranean Chicken Dinner: Step-by-Step Guide

    Making the Easy Slow Cooker Mediterranean Chicken Dinner is effortless, with straightforward instructions designed for cooks of all skill levels. Let’s walk through the process step-by-step:

    1. Prepare the Base:
    2. Start by preparing your slow cooker. Add the chopped onions, and minced garlic to the bottom. This forms a flavorful base that will infuse into the chicken.

    3. Add Chicken:

    4. Place the boneless, skinless chicken breasts on top of the onion and garlic mixture.

    5. Mix Ingredients:

    6. In a bowl, combine the cherry tomatoes, diced bell pepper, Kalamata olives, chicken broth, olive oil, oregano, salt, and pepper. Stir to incorporate all the flavors evenly.

    7. Layer the Mixture:

    8. Pour the tomato and vegetable mixture over the chicken breasts, ensuring they are partially submerged in the liquid for even cooking.

    9. Cook:

    10. Cover your slow cooker with a lid. Set it on low heat for 6-8 hours or high heat for 3-4 hours. This slow approach allows the flavors to meld beautifully while ensuring the chicken remains tender and juicy.

    11. Shred the Chicken:

    12. Once cooked, remove the chicken breasts from the slow cooker. Shred the chicken using two forks, then return it to the pot, mixing it with the sauce and vegetables.

    13. Final Touches:

    14. Garnish with fresh parsley if desired. This adds visual appeal and enhances the freshness of the dish.

    15. Serve:

    16. Serve hot over a bed of rice, quinoa, or with crusty bread to sop up the delightful sauce.

    By following these steps, you will prepare an unforgettable Mediterranean meal that will be a highlight on your dining table. And remember, if you’re adapting for dietary preferences, the method remains the same—just adjust the ingredients as necessary!

    Mastering Easy Slow Cooker Mediterranean Chicken Dinner: Advanced Tips and Variations

    To elevate your cooking experience with the Easy Slow Cooker Mediterranean Chicken Dinner, consider these advanced tips and potential variations:

    1. Build Flavor with Extra Herbs

    Incorporate fresh herbs like basil or thyme to amplify the flavors. Add them in the last hour of cooking for the freshest taste. Alternatively, for a quick version, opt for high-quality dried herbs.

    2. Try Different Proteins

    While chicken works wonderfully, consider experimenting with turkey or even fish, like tilapia or salmon, which cook quickly and offer a different texture profile. Keep an eye on cooking time to prevent overcooking fish.

    3. Experiment with Veggies

    Feel free to play with the vegetable combinations used in the recipe. Include seasonal produce such as zucchini, asparagus, or eggplant to keep the dish exciting. Each vegetable will bring a unique texture and flavor to the mix.

    4. Delight in Different Sauces

    Add a twist by substituting chicken broth with vegetable stock, white wine, or even tomato sauce for a rich sauce-like end product. Each option provides a different flavor adventure.

    5. Use Leftovers Creatively

    If you have leftovers, transform them into wraps or sandwiches with fresh greens and yogurt-based dressing. Alternatively, serve the dish over pasta for a filling lunch or dinner.

    These tips and variations will inspire creativity in your cooking while enhancing the familiar comfort of the Easy Slow Cooker Mediterranean Chicken Dinner.

    How to Store Easy Slow Cooker Mediterranean Chicken Dinner: Best Practices

    To properly store your Easy Slow Cooker Mediterranean Chicken Dinner, follow these guidelines for refrigeration, freezing, and reheating:

    Refrigeration:

    • Allow the dish to cool entirely before transferring it to airtight containers. You can refrigerate the dish for up to three days without losing flavor or texture. Be sure to label the container with the date.

    Freezing:

    • For longer storage, this dish freezes exceptionally well. Portion it into freezer-safe containers, ensuring there’s minimal exposure to air. You can freeze it for up to three months. When ready to enjoy, it’s best to thaw in the refrigerator overnight before reheating.

    Reheating:

    • Reheat leftovers in the microwave or on the stove over low heat, stirring occasionally to ensure even warming. If the dish appears dry when reheated, add a splash of chicken broth to rejuvenate the moisture.

    By following these storage practices, you can enjoy the delicious flavors of the Easy Slow Cooker Mediterranean Chicken Dinner even multiple days after preparing it.

    Nutritional Value of Easy Slow Cooker Mediterranean Chicken Dinner

    When looking for healthy options, the Easy Slow Cooker Mediterranean Chicken Dinner is an excellent choice. Here’s a nutritional breakdown per serving (based on a recipe serving 6):

    • Calories: Approximately 300 kcal
    • Protein: 30 g
    • Fat: 14 g
    • Carbohydrates: 20 g
    • Fiber: 3 g
    • Sodium: 400 mg
    • Cholesterol: 70 mg

    This nutrient-rich dish combines lean protein, healthy fats, and fiber from veggies, making it a balanced meal option. The low-calorie count also ensures you are enjoying delectable meals without compromising your health goals.

    Additionally, you can adjust any ingredients—like using low-sodium broth or reducing olive oil—to accommodate any specific dietary factors while keeping the essence of the dish intact.

    FAQs: Frequently Asked Questions About Easy Slow Cooker Mediterranean Chicken Dinner

    1. Can I use frozen chicken in this recipe?

    Yes, you can use frozen chicken; however, increase the cooking time by an hour. It’s advised to thaw it beforehand for the best results.

    2. How can I make this recipe spicier?

    To spice things up, add some crushed red pepper flakes or a dash of cayenne pepper, adjusting it based on your heat preference.

    3. Can I melt cheese on top of the dish?

    Absolutely! Adding a sprinkle of crumbled feta cheese just before serving enhances the dish’s Mediterranean flair.

    4. Is there a vegan option for this recipe?

    You can substitute chicken with chickpeas or lentils, maintaining the same cooking methods. Be mindful of altering the broth to a vegetable-based option.

    5. How do I adjust this recipe for a slow cooker with a smaller capacity?

    If using a smaller slow cooker, consider cutting the ingredients in half, ensuring cooking times may vary. Always check the internal temperature of the chicken to ensure it reaches 165°F.

    This FAQ section provides useful insights for anyone eager to try the Easy Slow Cooker Mediterranean Chicken Dinner, addressing common concerns and enhancing your cooking experience.

    In conclusion, this recipe is more than just a dinner idea; it represents a convenient, nutritious, and delicious way to embrace healthy eating without overwhelming your schedule. Enjoy cooking and savor the flavors of the Mediterranean!

  • Homemade Tangzhong Hot Cross Buns

    Homemade Tangzhong Hot Cross Buns

    Homemade Tangzhong Hot Cross Buns: A Tropical Delight

    Introduction to Homemade Tangzhong Hot Cross Buns

    Nothing captures the essence of celebration and comfort quite like the smell of freshly baked Hot Cross Buns. Whether you’re a busy parent seeking easy recipe ideas for family breakfasts or a baking enthusiast looking to expand your repertoire, this recipe for Homemade Tangzhong Hot Cross Buns is perfect for you. These decadent buns are not only delicious but also incredibly simple to make, allowing even novice bakers to enjoy homemade delights.

    What makes these buns truly special is the use of the tangzhong method, which involves cooking a small amount of flour and water to form a roux. This unique technique contributes to a softer, fluffier texture that keeps these buns fresh for days, making them perfect for meal prep or on-the-go snacks for students and professionals alike. Furthermore, they can easily be adapted to suit various dietary needs – from vegan to gluten-free options, making them inclusive for all.

    With their rich cinnamon spices and delightful cross-topping, these buns are more than just a treat; they’re a heartfelt way to bring family and friends together. So roll up your sleeves and get ready to embark on a journey of flavor and warmth. Let’s dive into the delicious world of Tangzhong Hot Cross Buns!

    Benefits and Advantages of Homemade Tangzhong Hot Cross Buns

    The Homemade Tangzhong Hot Cross Buns recipe doesn’t just offer a delightful end result. It comes with numerous benefits that can serve various dietary preferences and lifestyles.

    1. Ease of Preparation: One of the standout features of this recipe is its simplicity. With straightforward ingredients and easy-to-follow steps, even those with minimal baking experience can achieve professional-grade results in their own kitchens.

    2. Health Benefits: These buns are packed with whole grains and spices known for their health properties. Ingredients like whole wheat flour enhance the bun’s fiber content, promoting digestive health. Spices such as cinnamon have been shown to have anti-inflammatory properties, providing additional health benefits that are often overlooked in traditional recipes.

    3. Diet-Friendly Variations: The tangzhong method allows for substitutions to make the buns vegan, gluten-free, or low-calorie. For instance, incorporating a gluten-free flour blend can support those with gluten sensitivities, while using almond or coconut milk instead of dairy makes them suitable for vegan diets.

    4. Versatility: Aside from traditional uses during Easter and other celebrations, these hot cross buns can serve as a delicious breakfast or an afternoon snack. They can be enjoyed with butter, jam, or toasted, revealing a spectrum of delightful flavors that suit different palates.

    5. ** crowd-pleaser**: These buns are ideal for gatherings or family events, catering to a range of tastes. Whether you serve them as a holiday treat or anytime comfort food, they are sure to impress guests and loved ones.

    By understanding these benefits, you can appreciate why Homemade Tangzhong Hot Cross Buns are a fantastic addition to your baking repertoire. As you explore more recipe ideas, you will find that enhancing this classic with health-forward practices elevates both flavor and nutrition.

    Ingredients Overview

    Essential Ingredients for Homemade Tangzhong Hot Cross Buns

    For the perfect Tangzhong Hot Cross Buns, having the right ingredients on hand is key. Here’s a detailed list of what you’ll need, along with their purpose or benefits:

    For the Tangzhong

    • Water: 1/2 cup (120 ml) – Hydrates the flour, improving the final texture.
    • Bread Flour: 1/4 cup (30 g) – Adds structure to the roux, contributing to the softness of the buns.

    For the Dough

    • All-Purpose Flour: 3 cups (360 g) – The primary ingredient for the bun structure.
    • Granulated Sugar: 1/4 cup (50 g) – Sweetens the buns; feel free to reduce for a lower-calorie option.
    • Instant Yeast: 2 1/4 teaspoons (1 packet) – Helps the dough rise quickly and easily.
    • Salt: 1 teaspoon – Enhances flavor and strengthens gluten.
    • Milk: 3/4 cup (180 ml) – Adds moistness; consider almond or soy milk for a vegan option.
    • Unsalted Butter: 1/4 cup (60 g), softened – Improves flavor and texture; can be substituted with coconut oil for a dairy-free version.
    • Egg: 1 large – Provides richness and helps bind the dough; use flaxseed meal for a vegan alternative.
    • Cinnamon: 2 teaspoons – Adds warmth and classic flavor; you could also explore nutmeg or allspice for variation.
    • Raisins or Currants: 1 cup (150 g) – Sweet additions; can be swapped with chopped dried fruits for diversity.

    For the Glaze

    • Milk: 2 tablespoons – For brushing the tops for a glossy finish.
    • Granulated Sugar: 2 tablespoons (optional) – Sweetens the glaze; honey can be used for a different twist.

    Each ingredient plays a crucial part in achieving the perfect texture and flavor that defines these exquisite buns. Don’t hesitate to explore various substitutes based on your dietary preferences, and remember that these small adjustments can lead to a delightful variation in your homemade recipe ideas.

    Dietary Substitutions to Customize Your Homemade Tangzhong Hot Cross Buns

    Getting creative with substitutions not only makes your Tangzhong Hot Cross Buns healthier but also allows you to cater to specific dietary needs:

    1. Gluten-Free Option: Substitute all-purpose flour with a 1:1 gluten-free flour blend. Add a teaspoon of xanthan gum to ensure the buns maintain their structure.

    2. Vegan Option: Replace milk with almond or oat milk, butter with coconut oil or vegan margarine, and the egg can be substituted with a flaxseed mixture (1 tbsp flaxseed meal + 2.5 tbsp water, combined and set aside for 5 minutes).

    3. Low-Calorie Option: Reduce sugar to 2 tbsp and use unsweetened applesauce as a sweetener; this adds moisture while cutting down on calories.

    4. Nut-Free Option: Ensure to check brands for cross-contamination; if using any alternative milk, select ones free from nut traces.

    5. Spice Variations: For those who enjoy adventurous flavors, consider adding orange zest, cardamom, or anise seed to the dough for a unique twist.

    These substitutions not only accommodate various dietary needs but also encourage creativity in the kitchen. Embrace the chance to personalize your Homemade Tangzhong Hot Cross Buns, and enjoy the endless recipe ideas that follow!

    How to Prepare the Perfect Homemade Tangzhong Hot Cross Buns: Step-by-Step Guide

    Now that you have your ingredients ready and understand the benefits, it’s time to craft these delightful buns. Follow this step-by-step guide to achieve perfection every time:

    1. Prepare the Tangzhong: In a small saucepan over medium heat, whisk together the water and 1/4 cup bread flour. Stir continuously until it resembles a thick pudding (about 3-5 minutes). Remove from heat and let it cool to room temperature.

    2. Combine Dry Ingredients: In a large mixing bowl, combine the all-purpose flour, sugar, instant yeast, cinnamon, and salt. Whisk to distribute evenly.

    3. Incorporate Wet Ingredients: Make a well in the center of the dry mixture, and add the milk, softened butter, and egg. Add the cooled tangzhong to the same well.

    4. Mix Dough: Using a wooden spoon, mix until the dough begins to come together. If the mixture is too dry, add a splash of milk until it’s workable.

    5. Knead the Dough: Transfer the dough onto a lightly floured surface. Knead for about 10 minutes, or until smooth and elastic. (For a hands-free method, use a stand mixer with a dough hook.)

    6. Add Raisins: Flatten the dough slightly, sprinkle the raisins or currants, and fold the dough over. Knead once more until the fruit is evenly distributed.

    7. First Rise: Place the dough in a greased bowl, cover with a clean cloth or plastic wrap, and let it rise in a warm environment until it doubles in size (approximately 1-1.5 hours).

    8. Shape the Buns: Once risen, punch down the dough and divide it into 12 equal pieces. Shape each piece into a smooth ball and place them in a greased baking dish, ensuring they are touching slightly.

    9. Second Rise: Cover the baking dish again and let the dough rise for another 30-45 minutes, or until puffy.

    10. Preheat the Oven: During the second rising period, preheat your oven to 375°F (190°C).

    11. Create Crosses: Make a paste using 1/4 cup flour, water, and a pinch of salt. Use a piping bag or a zip-top bag with a corner snipped off to pipe crosses on top of each bun.

    12. Bake: Bake for 20-25 minutes or until golden brown.

    13. Glaze: Remove from the oven, and brush with a mixture of milk and sugar for a glossy finish.

    14. Cool: Allow the buns to cool for a few minutes before serving. Enjoy them warm!

    This step-by-step guide simplifies the process of making Homemade Tangzhong Hot Cross Buns. Feel free to adapt any steps according to your dietary needs. Such versatility keeps your baking exciting and provides a chance to try out various recipe ideas!

    Mastering Homemade Tangzhong Hot Cross Buns: Advanced Tips and Variations

    Once you’ve mastered the basic recipe, you might want to elevate your baking game further. Here are some advanced tips and variations for your Homemade Tangzhong Hot Cross Buns:

    1. Flavor Infusions: For an exotic twist, infuse your milk with spices like cardamom or brew in some chai before adding it to the dough. This subtle infusion will enhance the overall flavor profile.

    2. Gourmet Toppings: Instead of just a traditional cross, top the buns with a drizzle of lemon glaze or sprinkle with coarse sugar before baking.

    3. Fillings: Consider adding fillings such as lemon curd, chocolate chips, or even a cream cheese filling within the buns before their second rise for a surprise burst of flavor.

    4. Smaller Buns: For mini versions, divide the dough into smaller pieces and reduce baking time to 15-20 minutes. This way, you can create bite-sized delights perfect for gatherings.

    5. Reheating Techniques: If buns have been refrigerated, steam them lightly before serving to regain their fresh softness.

    Experimenting with these advanced techniques allows you to create signature versions of Homemade Tangzhong Hot Cross Buns that cater specifically to your tastes and those of your family and friends. Every new creation can serve as fresh recipe ideas to delight your loved ones and expand your baking horizons!

    How to Store Homemade Tangzhong Hot Cross Buns: Best Practices

    Proper storage of your Homemade Tangzhong Hot Cross Buns is essential to maintain their deliciousness. Here are some effective methods to ensure they last:

    1. Refrigeration: Once cooled, store the buns in an airtight container or wrap them tightly in plastic wrap. They can stay fresh in the refrigerator for up to a week.

    2. Freezing: For longer storage, freeze the buns. Place them in a single layer on a baking sheet to flash freeze them for about 1-2 hours, then transfer to a freezer-safe container or bag. They can be stored this way for up to three months.

    3. Thawing and Reheating: When ready to enjoy, simply remove the desired amount from the freezer. Leave them to thaw at room temperature for a couple of hours, or reheat straight from the freezer directly in the oven at 350°F (175°C) for about 10-15 minutes, just until warmed through.

    4. Avoid Moisture: Ensure buns are completely cool before storing to prevent them from becoming soggy due to trapped moisture.

    By following these storage methods, you can enjoy your Homemade Tangzhong Hot Cross Buns anytime without losing their delightful texture and flavor. You’ll not only save time but also have delicious homemade treats ready to accompany any meal!

    Nutritional Value of Homemade Tangzhong Hot Cross Buns

    Understanding the nutritional composition of your Homemade Tangzhong Hot Cross Buns empowers you to make informed decisions about your eating habits. Below is a breakdown of the approximate nutritional value per bun (based on traditional ingredients and without optional toppings):

    • Calories: 210
    • Total Fat: 5g
    • Saturated Fat: 3g
    • Cholesterol: 25mg
    • Sodium: 130mg
    • Total Carbohydrates: 38g
    • Dietary Fiber: 2g
    • Sugars: 6g
    • Protein: 5g

    If you opt for dietary substitutions, such as reducing the sugar or using gluten-free flours, the nutritional values may vary accordingly, often resulting in lower calorie and fat content.

    Keep in mind that the health benefits of the various spices used (like cinnamon) and any potential fiber enhancements from whole grain flours can positively affect your overall nutrition too. This holistic view presents your Homemade Tangzhong Hot Cross Buns as not just a delicious treat, but a mindful part of your diet. In this way, you can seamlessly intertwine fun baking experiences with valuable recipe ideas that contribute to healthful living!

    FAQs: Frequently Asked Questions About Homemade Tangzhong Hot Cross Buns

    1. Can I use all-purpose flour instead of bread flour for the tangzhong?

    Yes, you can use all-purpose flour in the tangzhong, but using bread flour will provide a slightly better texture due to its higher protein content.

    2. How can I ensure my buns are soft and fluffy?

    Make sure not to over-knead your dough and allow it to rise in a warm, draft-free area. Proper hydration with the tangzhong method also helps keep the buns soft.

    3. Are there gluten-free alternatives for this recipe?

    Absolutely! Replace all-purpose flour with a gluten-free blend that includes xanthan gum for the best results. Make sure to check that your other ingredients are gluten-free, too.

    4. How long do these buns last?

    Stored in an airtight container, they can last up to a week in the refrigerator or about three months in the freezer.

    5. Can I make these buns without sugar?

    You can opt to use sugar substitutes like honey or maple syrup, but remember that sugar contributes to the yeast’s activation, affecting the final texture.

    6. Is there a way to add more flavor?

    Definitely! Consider adding ingredients like zest from citrus fruits, cardamom, or vanilla for a more complex flavor profile.

    With these FAQs, you can troubleshoot common issues and enhance your baking experience as you create your Homemade Tangzhong Hot Cross Buns. These delightful treats are a wonderful way to impress guests, pamper your family, or simply indulge yourself with a bit of homemade nostalgia. Keep these tips in mind, and let the recipe ideas flourish in your kitchen!

  • Best Traditional British Hot Cross Buns

    Best Traditional British Hot Cross Buns

    Best Traditional British Hot Cross Buns: A Tropical Delight

    Introduction to Best Traditional British Hot Cross Buns

    As we celebrate the arrival of spring meals, it’s time to indulge in a delightful tradition: Hot Cross Buns. These delicious spiced sweet rolls, marked with a cross on top, are not only a culinary favorite but also a symbol of Easter in British culture. This recipe offers a lovely opportunity to bond with family and friends while enjoying a homemade treat that echoes the warm, inviting essence of springtime celebrations.

    Making these hot cross buns is incredibly straightforward, allowing even novice bakers to create a masterpiece. They’re inherently nutritious, packed with fruits and spices, and you can easily modify them to fit various dietary preferences. Whether you prefer vegan, gluten-free, or a lower-calorie version, this recipe caters to everyone without compromising on taste. You’ll discover that the aroma of freshly baked buns fills your kitchen, setting a joyful backdrop for any spring gathering or cozy morning at home.

    Involving simple ingredients like flour, yeast, and spices, the making of hot cross buns can be a delightful bonding experience, especially for busy parents, students, or newlywed couples. Indulging in this traditional British delicacy can nourish not just the body but also the soul, making it an integral part of your spring meals.

    Benefits and Advantages of Best Traditional British Hot Cross Buns

    Hot cross buns retain their charm due to their ease of preparation and multitude of benefits. Firstly, they serve as a fantastic treat for both celebrations and regular meals, introducing a touch of sweetness without overwhelming your palate. These little buns are perfect for breakfast or as an afternoon snack, making them a versatile piece in your culinary repertoire.

    Health-wise, traditional hot cross buns are enriched with dried fruits, which provide essential vitamins and nutrients. For instance, raisins and currants are excellent sources of iron and antioxidants, promoting overall health. Additionally, the spices—like cinnamon and nutmeg—are known for their anti-inflammatory properties, contributing to better digestion. Thus, incorporating hot cross buns into your spring meals can add not only flavor but also nutritional value to your diet.

    Importantly, with the recipe’s flexibility, you can adapt it to meet various dietary preferences. Whether you are vegan, gluten-free, or simply looking to lower calorie intake, this recipe accommodates all. Embracing the spirit of spring while prioritizing health and inclusivity resonates well with home cooks from all walks of life, making hot cross buns a timeless classic.

    Ingredients Overview

    Essential Ingredients for Best Traditional British Hot Cross Buns

    Here’s a detailed list of all the ingredients you’ll need to create these delicious hot cross buns, along with precise measurements and the role of each component:

    • Flour (500g, all-purpose or bread flour): Forms the base of the dough, providing structure and texture.

    • Sugar (75g, granulated or brown): Sweetens the buns and helps to activate the yeast.

    • Salt (1 tsp): Enhances the flavor while balancing sweetness.

    • Yeast (7g, dried active): The key ingredient that causes the buns to rise.

    • Milk (300ml, dairy or plant-based): Adds moisture to the dough. For a vegan option, opt for almond milk or oat milk.

    • Butter (50g, unsalted or vegan): Aids in flavor and tenderness.

    • Mixed spices (2 tsp, cinnamon, nutmeg): Provide the characteristic warm flavor profile.

    • Dried fruits (200g, mixed raisins and currants): Infuses sweetness and texture; rich in vitamins.

    • Egg (1, optional): Adds richness; for a vegan alternative, you can use a flax egg (1 tbsp flaxseed meal + 2.5 tbsp water).

    • For the cross (optional): A simple mix of flour and water creates the iconic topping.

    Dietary Substitutions to Customize Your Best Traditional British Hot Cross Buns

    1. Gluten-Free Option:

      • Substitute all-purpose flour with a gluten-free flour blend. Ensure the blend contains xanthan gum for better texture.
    2. Vegan Substitute:

      • Replace cow’s milk with almond, soy, or oat milk. Use plant-based butter or coconut oil instead of regular butter. Implement a flax egg in place of a chicken egg for binding.
    3. Lower-Calorie Variation:

      • Reduce sugar to 50g and replace half of the butter with unsweetened applesauce for a healthier fat alternative.
    4. Baked Additions:

      • Enhance them with nuts (e.g., walnuts or pecans) or seeds (like sunflower seeds) for added texture and nutrition.

    These substitutions allow for a custom experience that caters to diverse dietary needs, ensuring everyone can enjoy your homemade hot cross buns!

    How to Prepare the Perfect Best Traditional British Hot Cross Buns: Step-by-Step Guide

    Creating the perfect hot cross buns is a rewarding endeavor. Follow this easy step-by-step guide, and you’ll have spiced, fluffy buns ready in no time!

    1. Prepare the Base:
      In a large mixing bowl, combine the flour, sugar, spices, and salt. Make a well in the center for the yeast.

    2. Activate the Yeast:
      In a separate bowl, warm the milk (it should be lukewarm, not hot) and combine it with dried yeast. Let it sit for about 5-10 minutes until frothy.

    3. Mix in Wet Ingredients:
      Add the melted butter (or vegan substitute) and the frothy yeast mixture into the well in your dry ingredients.

    4. Add the Egg:
      If you’re using an egg, add it at this point to enrich the mixture. For vegan buns, use your flax egg.

    5. Incorporate Dried Fruits:
      Slowly fold in the mixed dried fruits to the dough until evenly distributed.

    6. Form the Dough:
      Knead the mixture in the bowl for about 10 minutes or until it becomes a smooth and elastic dough. If it’s too sticky, sprinkle a little more flour.

    7. First Rise:
      Cover the bowl with a damp cloth and let it rise in a warm place for about 1-2 hours, or until doubled in size.

    8. Shape the Buns:
      Punch down the risen dough and turn it onto a floured surface. Divide the dough into 12 equal pieces and shape each piece into a ball.

    9. Second Rise:
      Place the balls on a baking tray lined with parchment paper, ensuring they’re touching. Cover with a cloth, allowing them to rise again for about 30-45 minutes.

    10. Preheat the Oven:
      Preheat your oven to 220°C (430°F).

    11. Prepare the Cross Mixture:
      Mix equal parts of flour and water to create a thick paste. Use a piping bag or a small plastic bag with a corner cut off to pipe crosses onto the buns.

    12. Bake:
      Bake the buns in the preheated oven for 20-25 minutes until golden brown.

    13. Glaze (optional):
      Once baked, brush warm buns with a honey or syrup glaze to add shine and sweetness.

    14. Cool Down:
      Allow the buns to cool on a wire rack before serving.

    With each step guiding you through the process, you’ll be on your way to incorporating an iconic aspect of spring meals into your culinary collection!

    Mastering Best Traditional British Hot Cross Buns: Advanced Tips and Variations

    While the traditional recipe shines on its own, consider these advanced tips and fun variations to elevate your baking skills:

    1. Spice It Up:
    2. Experiment with spices! Adding ginger, allspice, or cardamom can deepen flavor and create a unique twist.

    3. Herbal Infusion:

    4. Incorporate a zest of citrus, like orange or lemon, into the dough for a refreshing taste.

    5. Sweet-Filling Variations:

    6. Try adding chocolate chips or a cinnamon and sugar filling inside the buns for a delightful surprise.

    7. Customize the Topping:

    8. Instead of the traditional cross, create a lattice pattern with pastry dough for a visually stunning effect.

    9. Serve with a Twist:

    10. Pair your hot cross buns with spreads like clotted cream, butter, or your favorite jams for an extra touch of indulgence during spring meals.

    With these variations and tips, you can tailor your hot cross buns to your tastes or the season, increasing their appeal and making every baking session a delightful exploration.

    How to Store Best Traditional British Hot Cross Buns: Best Practices

    To keep your hot cross buns fresh and flavorful, follow these best storage practices:

    Refrigeration

    • Store leftover buns in an airtight container in the refrigerator for up to 3 days. This method keeps them moist but may slightly harden their texture.

    Freezing

    • To freeze, wrap individual buns tightly in plastic wrap, then place them in a freezer-safe bag or container. They can stay frozen for up to 3 months. When ready to enjoy, simply take out and thaw at room temperature, or microwave for a few seconds.

    Reheating

    • For the best taste, reheat buns in a preheated oven at 180°C (350°F) for about 5-10 minutes. Alternatively, use a microwave for a quick serving, but be cautious as it can make them too soft.

    Employing these techniques ensures your hot cross buns remain delicious, making them an ideal component of your spring meals for weeks to come!

    Nutritional Value of Best Traditional British Hot Cross Buns

    Understanding the nutritional profile of your hot cross buns will encourage healthier eating habits while still indulging your sweet tooth. Below is the approximate nutritional breakdown per bun based on traditional recipes:

    • Calories: 200-250
    • Fat: 5g (0g saturated fat)
    • Carbohydrates: 45g
    • Fiber: 2g
    • Sugar: 10g
    • Protein: 5-6g

    Note: Nutritional values may vary based on substitutions and portion sizes.

    In addition to being delicious, hot cross buns can be a source of energy due to their carbohydrate content and provide essential nutrients. Incorporating dried fruits ensures you are also getting vitamins and minerals, making them a wholesome choice among your spring meals.

    FAQs: Frequently Asked Questions About Best Traditional British Hot Cross Buns

    1. Can I make Hot Cross Buns in advance?
    Yes, you can prepare the dough ahead of time and let it rise in the refrigerator overnight. In the morning, shape and bake them fresh!

    2. My buns didn’t rise as expected. What went wrong?
    This could be due to inactive yeast. Ensure your yeast is fresh and that your liquid is warm (not hot) when activating.

    3. How can I make Hot Cross Buns vegan?
    Replace dairy milk with any plant-based milk and use a flax egg instead of a chicken egg. Use vegan butter for a rich texture.

    4. Can I freeze Hot Cross Buns?
    Absolutely! Freeze them after baking, tightly wrapped. Thaw and refresh in the oven for a delicious treat.

    5. What should I serve with Hot Cross Buns?
    Enjoy them with butter, jam, or even cream cheese. They pair well with a cup of tea or coffee for a delightful spring meal.

    By addressing these common queries, you can ensure successful baking and enhance your experience with hot cross buns—perfect for anyone looking to add a delightful touch to their spring meals.


    This article is a comprehensive guide to creating the best traditional British hot cross buns, balancing ease and adaptability with deliciousness and tradition. Happy baking!

  • Tasty Hot Cross Buns With Greek Yogurt

    Tasty Hot Cross Buns With Greek Yogurt

    Tasty Hot Cross Buns With Greek Yogurt: A Tropical Delight

    Introduction to Tasty Hot Cross Buns With Greek Yogurt

    When it comes to breakfast ideas, few dishes can rival the delightful aroma and taste of freshly baked hot cross buns. This recipe for Tasty Hot Cross Buns With Greek Yogurt elevates the traditional favorite into a light and healthy treat that can easily be enjoyed any time of day. Packed with protein from Greek yogurt, these buns not only satisfy your morning cravings but also introduce a healthier twist to an age-old recipe.

    Picture this: soft, fluffy buns infused with warm spices, adorned with a light glaze, and a hint of sweetness. Whether you enjoy them plain or slathered with butter, they are a versatile choice for busy parents, food enthusiasts, and everyone in between. Plus, this recipe can be tailored to fit various dietary needs, including gluten-free and vegan diets, making them a universally appealing option.

    Whether you are a busy professional looking for quick breakfast ideas or a young couple wanting to bake together, these buns offer a unique experience that’s both simple and rewarding. The best part? They are incredibly easy to whip up, allowing you to enjoy warm, home-baked goods without the fuss. Dive into this article to discover how to make these tasty hot cross buns a staple in your kitchen!

    Benefits and Advantages of Tasty Hot Cross Buns With Greek Yogurt

    Creating delicious baked goods doesn’t have to be complicated! This recipe for Tasty Hot Cross Buns With Greek Yogurt proves that you can create something special without spending hours in the kitchen. These buns are not only straightforward to make, but they also come with several health benefits that set them apart from traditional options.

    Ease of Preparation

    The preparation process is streamlined, allowing even novice bakers to succeed. With just a handful of ingredients and minimal equipment, you can produce a batch of sweet, fragrant buns in no time. Perfect for those hectic mornings, they can be made in advance and warmed up as needed, saving valuable time for busy parents or working professionals.

    Health Benefits

    Greek yogurt is an excellent source of protein and probiotics, making it a wonderful addition to your diet. By swapping out the usual butter or shortening for Greek yogurt, you significantly reduce the fat content while boosting the nutritional profile. The yogurt not only enhances the texture of the buns, making them soft and pillowy, but also adds a subtle tang, ensuring that these breakfast ideas are as nutritious as they are delicious.

    Customizable for Dietary Needs

    This recipe is exceptionally flexible, accommodating various dietary preferences. With easy substitutions, these buns can be made vegan by using a plant-based yogurt or gluten-free by using a suitable flour blend. This adaptability means that no one has to miss out on the joy of freshly baked goods, making it an inspiring choice for families and friends with differing dietary requirements.

    By embracing simplicity and health, these Tasty Hot Cross Buns With Greek Yogurt provide a delightful and nutritious option for your breakfast ideas that everyone will love!

    Ingredients Overview

    Essential Ingredients for Tasty Hot Cross Buns With Greek Yogurt

    To create these Tasty Hot Cross Buns With Greek Yogurt, you will need the following essential ingredients:

    • 2 cups all-purpose flour (or gluten-free flour blend)
    • 1/2 cup Greek yogurt (or dairy-free yogurt for vegan options)
    • 1/2 cup warm milk (or almond milk for lactose-free)
    • 1/4 cup sugar (brown sugar or coconut sugar for a healthier option)
    • 1/4 cup butter (or coconut oil for a dairy-free version)
    • 1 packet (2.25 tsp) instant yeast
    • 1 tsp vanilla extract
    • 1 tsp cinnamon (for warm flavor)
    • 1/2 tsp nutmeg
    • 1/4 tsp salt
    • 1/4 cup mixed dried fruits or currants (substitute with nuts or seeds if desired)
    • 1 egg (or flaxseed egg for vegan alternative)

    Dietary Substitutions to Customize Your Tasty Hot Cross Buns With Greek Yogurt

    Baking is all about creativity! Here are some suggested substitutions to cater to various dietary needs:

    • Vegan Option: Substitute Greek yogurt with a plant-based yogurt. Use a flaxseed egg or chia egg instead of a chicken egg. Coconut oil can replace butter.

    • Gluten-Free Option: Use a gluten-free all-purpose flour blend. Make sure the flour contains xanthan gum for the best texture.

    • Low-Calorie Option: Use a sugar substitute like stevia or erythritol, and incorporate whole wheat flour instead of all-purpose flour to increase fiber.

    • Nut-Free: Omit any nuts from your mix-ins or replace them with seeds, like sunflower seeds or pumpkin seeds, to maintain a similar crunch without allergens.

    These substitutions ensure that everyone can enjoy the Tasty Hot Cross Buns with Greek Yogurt, regardless of dietary restrictions!

    How to Prepare the Perfect Tasty Hot Cross Buns With Greek Yogurt: Step-by-Step Guide

    Making Tasty Hot Cross Buns With Greek Yogurt is a straightforward process that can be completed in just a few simple steps. Here’s how to prepare them perfectly:

    1. Prepare the Base: In a large mixing bowl, combine the warm milk, Greek yogurt, and sugar. Stir until the sugar has dissolved, ensuring the mixture is warm but not hot (107°F-110°F is ideal).

    2. Activate the Yeast: Add the instant yeast to the mixture and let it sit for about 5 minutes. This allows the yeast to activate and starts the rising process.

    3. Combine Dry Ingredients: While the yeast is activating, in another bowl, whisk together the flour, cinnamon, nutmeg, and salt. This step ensures that the spices are evenly distributed throughout the dough.

    4. Mix Ingredients: Pour the dry mixture into the wet ingredients, adding the vanilla extract and mixed dried fruits. Incorporate the ingredients using a wooden spoon or spatula until a soft dough forms.

    5. Knead the Dough: Lightly flour a clean surface and transfer the dough to it. Knead the dough for about 5-7 minutes until it becomes smooth and elastic. If the dough is sticky, dust with a bit more flour as needed.

    6. First Rise: Place the dough in a greased bowl, cover it with a clean kitchen towel or plastic wrap, and let it rise in a warm environment for about 1 hour, or until it doubles in size.

    7. Shape the Buns: After the first rise, punch down the dough to release air. Divide it into 8 equal portions and shape each into a round bun. Place the buns on a greased baking sheet, ensuring they are close but not touching.

    8. Second Rise: Cover the buns again and let them rise for another 30 minutes. This will enhance their fluffiness.

    9. Preheat the Oven: While the buns are rising, preheat the oven to 375°F (190°C).

    10. Prepare the Crosses: In a small bowl, mix equal parts flour and water to create a paste. Using a piping bag or a plastic bag with a corner snipped off, pipe a cross over each bun.

    11. Bake: Bake the buns for 15-20 minutes, or until they are golden brown and sound hollow when tapped on the bottom.

    12. Glaze: While the buns are baking, create a simple glaze by mixing equal parts water and sugar in a saucepan until the sugar dissolves. Brush the glaze over the warm buns as soon as they come out of the oven for a shiny finish.

    13. Cool and Enjoy: Let the buns cool slightly on a wire rack before serving.

    Each step is designed for optimal success, ensuring a lovely batch of Tasty Hot Cross Buns With Greek Yogurt that is perfect for breakfast, snacks, or dessert!

    Mastering Tasty Hot Cross Buns With Greek Yogurt: Advanced Tips and Variations

    To elevate your baking experience, consider these advanced tips and variations when making your Tasty Hot Cross Buns With Greek Yogurt:

    • Incorporate Citrus: Zest a lemon or orange into your dough for a fresh, citrusy flavor.

    • Experiment with Spices: Add a pinch of ground ginger or cardamom for an exotic twist.

    • Chocolate Chip Variation: For a dessert-inspired version, fold in chocolate chips instead of dried fruit, creating a sweet treat that’s irresistible!

    • Use a Slow Cooker: If you want to try an innovative approach, you can also make these buns in a slow cooker for a softer texture.

    • Make Mini Buns: If you prefer smaller portions, divide your dough into 12-16 pieces instead of 8, and enjoy bite-sized hot cross buns perfect for kids or entertaining guests.

    These variations allow you to customize the recipe to fit your adventurous spirit in the kitchen while keeping the core elements intact.

    How to Store Tasty Hot Cross Buns With Greek Yogurt: Best Practices

    Proper storage of your Tasty Hot Cross Buns With Greek Yogurt ensures that they maintain their delightful freshness. Here are a few best practices:

    • At Room Temperature: Store the buns in an airtight container at room temperature for up to 3 days. Ensure they are completely cooled before sealing to prevent moisture buildup.

    • Refrigeration: If you plan to keep them longer, you can refrigerate the buns for up to a week. Just remember to wrap them tightly in plastic wrap or place them in an airtight container to prevent them from drying out.

    • Freezing: To extend their shelf life even further, freeze the buns. Wrap each bun individually in plastic wrap and place them in a freezer-safe bag. They can be frozen for up to 3 months. To enjoy, simply thaw at room temperature or reheat in a microwave for a few seconds.

    By following these storage solutions, you can ensure that your breakfast ideas remain delicious and ready to enjoy whenever a craving strikes!

    Nutritional Value of Tasty Hot Cross Buns With Greek Yogurt

    Understanding the nutritional value of your food is essential, especially for diet-conscious individuals. Here’s a breakdown of the estimated nutrition per bun (based on the recipe making 8 buns):

    • Calories: 190 kcal
    • Total Fat: 4g (Saturated fat: 2g)
    • Cholesterol: 30mg
    • Sodium: 150mg
    • Total Carbohydrates: 33g
    • Dietary Fiber: 1g
    • Sugars: 5g
    • Protein: 5g

    These buns offer a balanced combination of macronutrients, making them a wholesome option for your breakfast ideas. With lower fat content, a good source of protein from Greek yogurt, and the option to incorporate healthy substitutions, you can enjoy a delicious treat that fuels your day right!

    FAQs: Frequently Asked Questions About Tasty Hot Cross Buns With Greek Yogurt

    Q1: Can I make these hot cross buns ahead of time?
    Yes, you can prepare the dough the night before and refrigerate it after the first rise. On baking day, simply bring the dough to room temperature, shape, and complete the second rise before baking.

    Q2: What can I use instead of Greek yogurt?
    You can substitute Greek yogurt with any type of plain, unsweetened yogurt, including dairy-free options like almond or coconut yogurt.

    Q3: How can I make these buns sweeter?
    If you prefer a sweeter taste, increase the sugar in the dough or drizzle some honey or maple syrup on top after baking.

    Q4: Can I add fillings to the buns?
    Absolutely! Feel free to add chocolate chips, nuts, or even a cream cheese filling for an extra indulgent treat.

    Q5: What is the best way to reheat the buns?
    The best way to reheat these buns is in the microwave for about 10-15 seconds or in the oven at 350°F for 5-10 minutes until warmed through.

    By addressing these common questions, readers can approach the recipe with confidence and creativity, ensuring a satisfying baking experience while enjoying their delicious hot cross buns.


    With their delightful flavor and healthy ingredients, Tasty Hot Cross Buns With Greek Yogurt is a fantastic addition to your breakfast ideas or any time snack. The combination of simplicity, health benefits, and adaptability makes them an excellent choice for every type of cook. Grab your ingredients, roll up your sleeves, and embark on this baking adventure today!